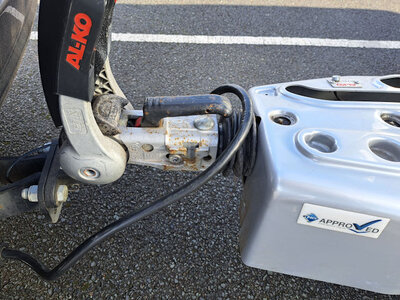
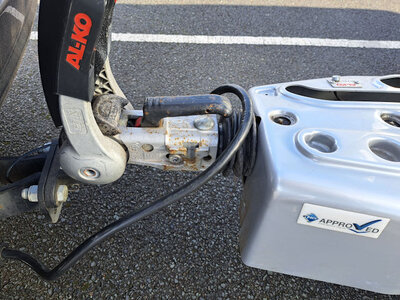
ALKO friction pads replacing

Jul 18, 2017
14,194
4,224
40,935
Visit site
It seems that the friction pads for the 3004 hitch on our caravan need replacing. We would prefer to use the genuine ones. As I admit I am not a DIY person and I have never done this before, I am going to have a go. I have looked on Amazon and I am a little confused about which pads to buy?

Alko pads.jpg
 

Attachments

  • Hitch also pads.jpg
    Hitch also pads.jpg
    106.4 KB · Views: 3
Nov 11, 2009
22,265
7,389
50,935
Visit site
How do you know that they require replacing? I bought mine from Alko using the stabiliser model type as the basis for the order. But more expensive but confident that I would receive the genuine article.

This might help you

 
Last edited:

JTQ

May 7, 2005
3,533
1,364
20,935
Visit site
If you are changing for "wear" then there are wear indicators, for checking both the sets involved, the side pads, and the front with back shells.
The side pad wear is indicated on the bosses at the base of the big Black, [ in your case], pad loading lever. If you are mega keen, the handle can be removed to check the individual wears, port & starboard.
The front & rear set indicator is via little red green plastic pieces, at the base of the ball release handle.
Changing the former is an easier quicker task than changing the front & rear set.
Google search for the specifics.
Edit: Found one bit for you.
LINK

-------------------------
It would be a surprise to me if you have travelled far enough to have worn either sets out, looked after we are talking 30K plus towed miles in my experience; way the more likely is the side pads are "grubby" and or glazed, these can be cleaned & de-glazed with course "sandpaper" and brake pad cleaner fluid.

I find it way easier to remove the whole assembly for the front and rear pad change and do it on a bench, than get my aging body in place to work upside down inside the hitch. A lot less chance of screwing it up if you can see what you are doing, but then it is also tempting at 30K miles to strip the lot and properly "service" the assembly.
 
Last edited:
Oct 8, 2006
1,898
624
19,935
Visit site
You are more likely to have a pad failure than a wear problem. One issue is that the upper pad is only held in place by a single screw through the casing below the big lever under the black or red rubber bumper. As a result the 'pip' that sits up into a hole under the big handle and suffers sufficient additional load that it sheers. Replacing is rather fiddley and you might hurt your fingers but follow the instructions (Google is your friend) and you can do it.
 
  • Like
Reactions: Hutch
Jul 18, 2017
14,194
4,224
40,935
Visit site
Not sure if I am looking at the correct indicator? Just in front of the small coupling lever there is a red and green indicator and hardly any green to be seen unless that is to show that it is connected correctly? There is a red button on the front, but it only shows red. I never thought of checking the indicators on the side.

If I lift that small lever it does not stay up which is why I thought that perhaps the friction pads were worn. I have to physically hold it up letting go as the hitch drops onto the towball. Reverse when unhitching.
 
Last edited:

JTQ

May 7, 2005
3,533
1,364
20,935
Visit site
If I lift that small lever it does not stay up which is why I thought that perhaps the friction pads were worn. I have to physically hold it up letting go as the hitch drops onto the towball.

My experience with that issue on the 2004 suggests that is simply the latching pieces need cleaning and relubricating.
These bits in that earlier design needed lubricating, and that is exactly what I found.
Of course real care is needed in doing this as lubricants in the wrong places lose the frictional damping. Another good reason to work with the unit on the bench rather than struggle effectively working "blind" with it mounted.

It is not related to side pad wear, and very remotely related to front & rear set wear.
 
Last edited:
Nov 16, 2015
11,305
3,556
40,935
Visit site
Not sure if I am looking at the correct indicator? Just in front of the small coupling lever there is a red and green indicator and hardly any green to be seen unless that is to show that it is connected correctly? There is a red button on the front, but it only shows red. I never thought of checking the indicators on the side.

If I lift that small lever it does not stay up which is why I thought that perhaps the friction pads were worn. I have to physically hold it up letting go as the hitch drops onto the towball. Reverse when unhitching.
Buckman, truly, is your tow hitch sounding like a dog with it's Baxxs caught in an electric fence. If not then probably at less than a towing mileage less than 15k miles, your tow hitch just needs a good clean, use the brake cleaner foam that clings.
From previous experience of yor postings seriously I think you will probably,lose the seals or shims that may be fitted in the Alko hitch, if you try to do it yourself. You have to have the correct torx wrench to do the front and aft, upper wear units. The side ones are easy, but best to do laying on your side.
 
Nov 16, 2015
11,305
3,556
40,935
Visit site
Following on from this, has anyone ever found any references to the shim settings for fitting new side pads.
I would think the settings might be,
Fit new side pads, Add shims until the lever setting is at the "New" setting. ie lever just on the front Arrows.
Does that make sense. ???
 

JTQ

May 7, 2005
3,533
1,364
20,935
Visit site
yes


Edit: in my link figs 16 and 16a refer, together with written text.
My pads came with a set of shims.

Good point you made on the "O" rings that add a bit of useful resistance to the side pad stems, easily knocked out and not easy to put back if I remember. As I had said, IMO way easier to do the lot on the bench in workshop conditions. Having a spare towball, also helps.
 
Last edited:
  • Like
Reactions: Hutch
Jun 20, 2005
18,437
4,257
50,935
Visit site
I posted a few weeks ago about changing the left stabiliser lever which had fractured.

The pads are a very hard composite material. I’ll deal with the side ones.
It will take thousands of miles to wear them out. Moreso they get contaminated. Easily fixed with cleaning as described by Hutch.

Within the hitch housing are two O Rings. They hold the pads in place and enable them to move into and away from the tow ball as the lever is pulled up,or pulled down.
DO NOT us non Al-ko O rings. If you do you will,soon find the assembly doesn’t work properly. You may experience getting hitched safely or worse the hitch will not disengage.
 
  • Like
Reactions: otherclive
Jul 18, 2017
14,194
4,224
40,935
Visit site
My experience with that issue on the 2004 suggests that is simply the latching pieces need cleaning and relubricating.
These bits in that earlier design needed lubricating, and that is exactly what I found.
Of course real care is needed in doing this as lubricants in the wrong places lose the frictional damping. Another good reason to work with the unit on the bench rather than struggle effectively working "blind" with it mounted.

It is not related to side pad wear, and very remotely related to front & rear set wear.
The caravan was serviced last Oct and has only done one outing since. I would have thought that lubricating the hitch would be part of the service as it is part of the running gear?
 

JTQ

May 7, 2005
3,533
1,364
20,935
Visit site
The caravan was serviced last Oct and has only done one outing since. I would have thought that lubricating the hitch would be part of the service as it is part of the running gear?
I note from the link I gave you that in the 3004 sheet that latch lubricating aspect is no longer included, it is in the 2004, and I can't see any physical changes in the latch pieces to support that omission.
I certainly have found in my 2004 it was a needed servicing routine over its now 40K odd miles of use. That latching handle irritatingly stops locking up till its bits are cleaned and lubricated, then it works just fine again.

Also, you have way more faith than I have ever found justified in this industry from after servicing right back to building and designing.
 
Last edited:
May 10, 2020
294
192
4,735
Visit site
Just a little advice here if you do change the upper pad. Just make sure that the retaining screw sits down properly. (Head below the pad surface) . Failing to do so will destroy your tow ball very quickly. That screw can feel like it’s tightened down properly but may not be.
Don’t ask me how I know
 

JTQ

May 7, 2005
3,533
1,364
20,935
Visit site
Don’t ask me how I know
I can guess ;)
More seriously does it "destroy" it?
Surely it only leaves a bit of local marking that primarily after dressing with some "wet & dry" will be indents that should have next to no real detriment to the towball's functioning? Cosmetic?
 
May 10, 2020
294
192
4,735
Visit site
I can guess ;)
More seriously does it "destroy" it?
Surely it only leaves a bit of local marking that primarily after dressing with some "wet & dry" will be indents that should have next to no real detriment to the towball's functioning? Cosmetic?
Yes you’re right…. Depending on how much screw was protruding…. The fact remains that a ball with a gouged surface will certainly reduce the life of the friction pad. My ball ( oh matron) was in pretty rough state and for the price and peace of mind I just replaced it.
 
Jul 18, 2017
14,194
4,224
40,935
Visit site
Going on above responses I will check the wear properly the next time we are at the caravan. I thought that because the coupling lever would not stay up was a result of worn friction pads. Seems that all the coupling lever needs is a bit of servicing?
 

JTQ

May 7, 2005
3,533
1,364
20,935
Visit site
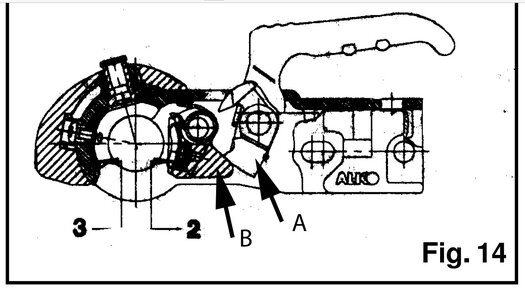
IMO the bits of interest here in respect to the handle not latching up are shown in the screen shot of the Al-KO 3004's document I linked you to. I have notated them "A" & "B".
Al-Ko 3004.jpg
The base of the handle "A" has a cam lower end that with the handle down slides over the block "B" ensuring that block "B" remains tucked under the ball, locking the hitch securely over the ball. That is how the handle interacts to prevent the hitch coming off the ball, together with allowing it to be put on and taken off the ball.

Lifting the handle enables block "B" to pivot to the right about its hinge pin, pushed there by a spring wrapped around the hinge pin.
In that backwards position the block "B's" heel can and should register into a dimple on the front of the handles cam piece "A".

In that state the handle is temporarily hatched "up"; in your case and as happened previously with mine, not doing so reliably.

I found that generally de-gunging [time served engineer's term} all the bits concerned, and relubricating these had it back working as new. Now I have no ideal which little element of that servicing did the trick or if it was an accumulation of my actions, but what I did has worked. In the 16 years I have had this van I know I have serviced it twice in this way.
As I have stressed, as it is so easily removed as an assembly, and servicing it properly without doing so is to me so difficult, removing it and working on it on a bench is strongly my recommendation.

I would not expect a serice engineer not instructed to address this handle not latching issue or other AKS issue, to dream of working on it other than check it functions the one time he trys.
 
Last edited:

TRENDING THREADS

Latest posts