Corner steady alignment problem

May 8, 2023
6
1
15
Visit site
Hi,
New to this forum.
My name is Hamish and im from New Zealand.
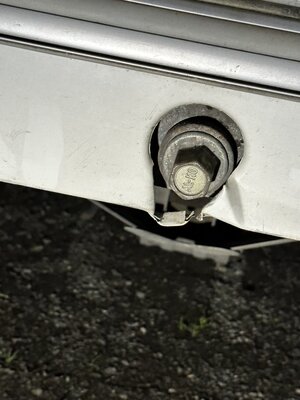
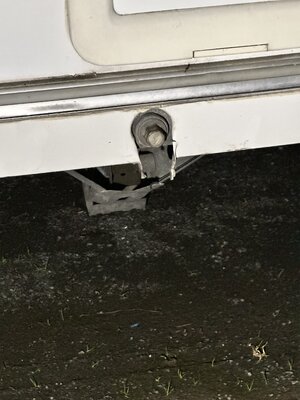
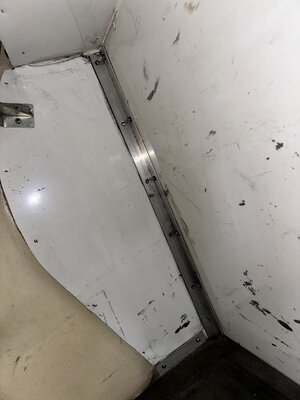
I have a 2010 swift celebrating 6 berth with triple bunks setup. We are currently travelling around for a few weeks and the last couple sites we have parked up at have noticed the front stedies have moved down and damaged the trim. They are still firmly fixed to the floor. What could be causing this to happen?
Thanks
 
Nov 11, 2009
20,395
6,263
50,935
Visit site
Have they been over stressed whilst levelling the caravan? They are not designed for taking much load they just steady the van when levelled.
 
Jun 16, 2020
4,702
1,865
6,935
Visit site
If the steady feels solidly fixed to the floor and is operating normally, perhaps the damage is unrelated. Perhaps hit from underneath.

John
 
Aug 14, 2020
74
67
4,635
Visit site
Hamish,
You've checked that the steady is firmly fixed to the floor but, it may be worth checking that the floor is still firmly fixed to the walls!
Mick
 
  • Like
Reactions: Hutch
May 8, 2023
6
1
15
Visit site
Hamish,
You've checked that the steady is firmly fixed to the floor but, it may be worth checking that the floor is still firmly fixed to the walls!
Mick
Ill look into the walls, on quick inspection there appeared to be no gaps, does any trim need to be removed to inspect the joint properly?
Thanks
 
Aug 14, 2020
74
67
4,635
Visit site
I think you need to look underneath at the attachments. There was a thread on here (or maybe another forum) about floor/wall detachments and I seem to remember there being pictures.
Someone else may remember the thread - or be more adept at using the search function.
 
May 8, 2023
6
1
15
Visit site
This i may have found the culprit. The front has come away from floor in front locker and screws have snapped. How to repair? Obviously i can realign the wall drill and screw new holes and probably add some adheasive also, but how will the wall further along be affected? Being a 2010 model swift what is the construction, is it set ontop of floor with screws or on side and screwed into side?
I have attached a photo where you can see screws missing from angle piece. It is the same on both side of locker
 

Attachments

  • IMG_3941.jpeg
    IMG_3941.jpeg
    1.3 MB · Views: 13
Aug 14, 2020
74
67
4,635
Visit site
OK, we're at a point where somebody with knowledge of the problem plus answers is required and I'm not sure the discussion took place on this forum..
Failing that I'm more than happy to fly-out (at your expense!) and work-out a repair.
I would also want a generous supply of Speight's Dark to keep me powered!
 
Jun 6, 2006
701
82
18,935
Visit site
This i may have found the culprit. The front has come away from floor in front locker and screws have snapped. How to repair? Obviously i can realign the wall drill and screw new holes and probably add some adheasive also, but how will the wall further along be affected? Being a 2010 model swift what is the construction, is it set ontop of floor with screws or on side and screwed into side?
I have attached a photo where you can see screws missing from angle piece. It is the same on both side of locker
It might need a similar repair to the Swift 2017 recall they did.

Check where the wall meets the floor also check for a floating floor
 
Aug 14, 2020
74
67
4,635
Visit site
Hamish,

From another forum, is this (edited) quote which deals with a Swift of the era you've got:-

'First, get under the caravan with a good light and have a thorough check round all the side wall/floor connections also bulkhead/floor connection, to see if there is any evidence of separation or loose screws. It may be possible to re-tighten any which are loose, or replace them with similar screws of a slightly plumper(sic) diameter. You can also look closely at the inside of the same joints (peel the floor vinyl back a bit) and see if there is any sign of joints opening.
Your caravan is built
... differently to the present ranges ... your caravan is made with a textured silver/grey aluminium lining in the gas bottle locker. You can probably put your fingers around the front edges of the aluminium sheet at each side where it is shaped to meet the GRP moulding. The aluminium angles connecting the side walls to the bulkhead are fitted over the silver/grey lining.
The thickness of the lining is about 1mm and the side wall panel about 24mm (check this yourself), so the screws should be no more than 20 mm length. The holes in the aluminium angles are clearance for the original screws, so the diameter of those screws was about 1mm less. Go up one size in diameter to give the new screws more bite, and see if you can get that diameter through the clearance holes in the aluminium angle. Obviously, the screws should be flat headed. Ideally stainless steel, but zinc coated if that's all you can get. There will be a perforated steel plate inside the side wall for the screws to grip.
Please note that the Swift instruction does not specify the correct screws for the bulkhead/sidewall connection, as these are not plump enough and will not always bite properly in the perforated steel panels, which may have previously been stripped through over tightening. The dealer service people use plumper screws for this reason.'


I've had a look around and found the Swift Repair file for the front floor repair of 2015(ish) onwards caravans. As said your caravan is made differently but it will give you (or whoever you choose to do the repair) a some idea of the kind of thing involved.

Kia Ora and good luck.
Mick
 
  • Like
Reactions: Jcloughie
Nov 11, 2009
20,395
6,263
50,935
Visit site
Thank you. That’s a comprehensive repair procedure from Swift, which goes to show the complexity of a caravan even in a relatively “ low key” area. Given that vans have been around for so long it’s a great pity that such defects are arising.
 

TRENDING THREADS

Latest posts