Damp 🥺☹️ Advice needed please

Page 2 - Passionate about caravans & motorhome? Join our community to share that passion with a global audience!
Mar 14, 2005
18,302
3,588
50,935
Visit site
Totally disagree. Of course any leak needs to be addressed but the question being answered was how to dry it out. The method I suggested is that used by the caravan industry. My dealer did exactly that with mine after they put a screw through a pipe. Also, I know from experience that using dehumidifiers really work and very powerfully. In a situation where trainees were wet rendering training rooms constantly. Dehumidifiers were left on overnight in order to prepare for the next trainees. They accelerated the process by at least 1 week. Just look at what is used in flooded houses!

Of course they will increase the the effect of moisture being ‘sucked in’. But that only emphasises the drawing effect of dehumidifiers on the structure.

On this, Prof, you are simply wrong.

At this stage the OP it not even sure if there is a leak. In the mean time drying the structure can only be a good thing. And it can also be a great help in locating the location of the ingress.

Note that the damp readings are only 22%. I know that Lunar, (in their day). Would only consider readings of plus 25% as damp.


John
John.
I was quite specific in my reply. Whilst the leak still exists, the use of a dehumidifier will actually increase the rater of moisture transfer.

Once the leak has been stopped, then using a dehumidifier may help to remove the excess moisture, but once its down to ambient levels the continued use of a dehumidifier has very little value, as its basically continually trying to dry the normal ventilation air and not making much if any difference to the moisture content of the caravans construction.
 
Jun 16, 2020
5,122
2,190
11,935
Visit site
John.
I was quite specific in my reply. Whilst the leak still exists, the use of a dehumidifier will actually increase the rater of moisture transfer.

Once the leak has been stopped, then using a dehumidifier may help to remove the excess moisture, but once its down to ambient levels the continued use of a dehumidifier has very little value, as its basically continually trying to dry the normal ventilation air and not making much if any difference to the moisture content of the caravans construction.

I still disagree for all the points I raised. Although your point is valid. The advantages far outway the possible disadvantages.


John
 
Oct 17, 2010
1,282
523
19,435
Visit site
I am the proud owner of an old Adria Optima - I love her dearly and am sad to say today I discovered the dreaded Damp!!!
There is no smell of damp and no sponge like feel to the wall but It’s visable 🥺☹
What shall I do first ? It got a reading of 22 on the damp meter x ☹
Be kind ! I’m a newbie vanner with a tiny budgetxx

How are you getting on with your van, is the damp clearing??
 
  • Like
Reactions: ISTIAWAN
Jun 20, 2005
18,440
4,260
50,935
Visit site
Istiawan asked “What shall I do first?
1. Identify source of water ingress. Looks to me with the age of the van , the awning rail seal and front panel to roof seal have both failed. Strip down the joints, thoroughly clean ,reassemble with generous application of either Soudaseal RV 61 or Sikaflex 512, smoothing down and removing any over excess.

2.Drying out . You have plenty of very good ideas from the guys in here.
Good luck and please keep us posted on your progress
 
  • Like
Reactions: DaveA1
Mar 10, 2022
39
23
35
Visit site
Hi 👋🏼
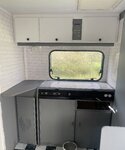
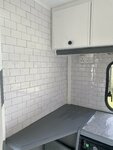
Well i have been airing it out as much as possible and today I have filled small holes internally / sanded ready for damp proof painting tomorrow!
I haven’t had any more damp or wetness and outside I painted roof sealant paint along the seams - it’s probably the wrong thing to do but so far so good and im on my own and total novice ! Lol

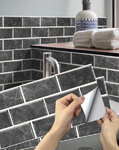
I did almost finish the other end too - tiling and painting ….so yeah almost done that section at least xx.
 

Attachments

  • B88AF364-3E69-43DC-9F34-4585BAF5B934.jpeg
    B88AF364-3E69-43DC-9F34-4585BAF5B934.jpeg
    1.2 MB · Views: 21
  • F63CA506-4298-43CB-B289-C18A5263F37E.jpeg
    F63CA506-4298-43CB-B289-C18A5263F37E.jpeg
    2 MB · Views: 20
Jan 19, 2002
1,636
493
19,935
Visit site
Not sure what payload your van allows but in any updates don’t forget to consider the weight - if you have ceramic tiled the rear end this comes off the payload and increased load at the rear you need to consider both the new MIRO and the nose weight to avoid instability when towing.
 
Mar 27, 2011
1,332
507
19,435
Visit site
I looked at the tiles and was impressed with how they looked but I expected a disaster when you towed the van and they all started falling off, never mind the huge weight, a great alternative and hides the crud inside you just need to try as best as you can to keep more water coming in from the outer skin.

BP
 
Jul 18, 2017
14,205
4,231
40,935
Visit site
I looked at the tiles and was impressed with how they looked but I expected a disaster when you towed the van and they all started falling off, never mind the huge weight, a great alternative and hides the crud inside you just need to try as best as you can to keep more water coming in from the outer skin.

BP
I thought they were the stick on sheets which are very lightweight?
 
  • Like
Reactions: ISTIAWAN
Jan 3, 2012
10,157
2,239
40,935
Visit site
Hi 👋🏼
Well i have been airing it out as much as possible and today I have filled small holes internally / sanded ready for damp proof painting tomorrow!
I haven’t had any more damp or wetness and outside I painted roof sealant paint along the seams - it’s probably the wrong thing to do but so far so good and im on my own and total novice ! Lol

I did almost finish the other end too - tiling and painting ….so yeah almost done that section at least xx.
Looks great
 
  • Like
Reactions: ISTIAWAN
Mar 10, 2022
39
23
35
Visit site
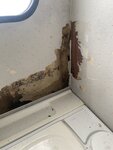
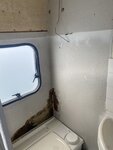
SAD DAY 😩😩😩😩

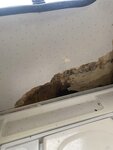
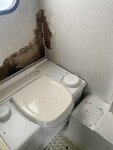
I finally got round to removing 3(!) layers of wallpaper in the bathroom and plastic coverings on the walls and found this corner 🥺🥺🥺🥺🤦🏼‍♀️
reasing 80% on my damp meter at it’s worse part ….feel so sad ……is my Van doomed ?????
 

Attachments

  • CABD5623-4C58-45C6-AB56-9F1DBC3EA87D.jpeg
    CABD5623-4C58-45C6-AB56-9F1DBC3EA87D.jpeg
    599.2 KB · Views: 18
  • D26BFE49-3E37-4248-A4C0-469D08BD1E1B.jpeg
    D26BFE49-3E37-4248-A4C0-469D08BD1E1B.jpeg
    531.6 KB · Views: 19
  • B641E9B3-5CE2-4089-8584-7C563C37673A.jpeg
    B641E9B3-5CE2-4089-8584-7C563C37673A.jpeg
    623.2 KB · Views: 18
  • 1720F204-DD1E-4954-A7AE-9012C9F8D4D4.jpeg
    1720F204-DD1E-4954-A7AE-9012C9F8D4D4.jpeg
    457.6 KB · Views: 17
Mar 10, 2022
39
23
35
Visit site
Similar damage has been tackled successfully by others. Is it localised or wide spread? The cause is the first thing to find.

John
I have found the handle on the back ( outside ) is off! I have sourced another now and I will repair today. Using matchstick and wood glue as I have seen online - I assume that this is the cause of the damp as the 4 screw holes also gave me a high reading - the van hasn’t been moved for a year 😩😩😩
I guess I will have to inspect underneath -not sure how to get that loo out at all so hopefully I can work round it ! Maybe the panel at the back of the loo will come off xx
 
Jan 19, 2002
1,636
493
19,935
Visit site
To remove the loo you will likely find 4 screws to the floor beneath the cassette. Then remove any internal trims perhaps at the sides or rear of the internal housing, likewise release any silicone, then lift it up about 2 inches as it should be hooked over a bracket (or brackets) attached to the rear wall. I cant find this on a video, but if you visit the Thetford site and click through to bench toilets there are installation instructions which may provide a guide.
 
  • Like
Reactions: ISTIAWAN
Oct 17, 2010
1,282
523
19,435
Visit site
Your van is repairable, Have a look at this video shows you the techniques When repairing damp,
Sorry! Won't play.

Try Bailey Pageant Leak Repair. On You Tube.
 
Last edited:
Mar 10, 2022
39
23
35
Visit site
Everything is repairable, but to how well and to how much to pay. .
Keep going I think you are doing well.
Thank you sooooo much xx

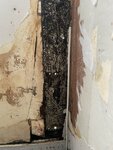
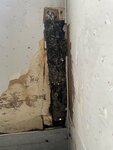
I have removed all the deadwood and found the source of the damp which was the outside handle.
So far I am ventilating it all as the weather is currently nice and sunny 🌞!

My plan is to clean it all and then to apply a wooden baton along the back for the handle to be screwed into, fixing this with something stixal from tool station, I have heard the clear one sticks better!?? Then maybe using expandable foam with a wood panel finishing it off ??? Papering the whole thing ?

Who knows?! Winging it as always 🤣❤️🤣
 

Attachments

  • 778BF4FC-8E48-47A7-9AC1-243D30DBA8EA.jpeg
    778BF4FC-8E48-47A7-9AC1-243D30DBA8EA.jpeg
    1.9 MB · Views: 15
  • 778E9585-0F9B-45DB-8982-DAD5E02D741F.jpeg
    778E9585-0F9B-45DB-8982-DAD5E02D741F.jpeg
    1.6 MB · Views: 15
Jan 19, 2002
1,636
493
19,935
Visit site
Not quite sure what we are viewing in the photos, but I hope that black stuff was not once timber! No idea if it is any use on caravan frame but if you google 'Ronseal Wet Rot hardener' there are several videos showing use on building soffits etc, followed by Ronseal wood filler. Prior to plastic windows I used this in this externally in the corners of window frames. However the caravan frame is a part of the structural integrity of the van so replacement with new timber would be preferable. Sikaflex mastic is usually recommended for refixing your grab handles (and bedding awning rails et al), with screws into the new timber baton as you describe.
 
Oct 17, 2010
1,282
523
19,435
Visit site
Keep going you are winning. As above if the black stuff is timber I would replace it, so handle is firmly fixed.

As audiorob Says use of Sikaflex 512 is recommended, and I use nothing else, it's a very good flexible adehsive.

As for treating the timber I soaked mine in the preservative, they use on house timbers, allow to dry.

When dry, can be worked as normal
 

TRENDING THREADS

Latest posts