Hairline cracks

May 10, 2020
227
125
4,635
Visit site
Good morning all, looking for recommendations please.
Subject caravan is a 2016 Swift 560.
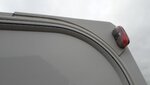
I have a couple of small cracks in the rear panel around the high level marker lights. Nothing worrying but I would like to address them sooner rather than later. I intend to use Captain Tolleys crack sealer first then slightly vee out the surface and then fill with an epoxy. Can anyone please recommend an epoxy to use? Preferably white.
I will drill a 2mm hole at the end of the crack beforehand. Thanks all.
Best regards
R
 
Nov 11, 2009
20,395
6,263
50,935
Visit site
I tried the same on my Sprite which developed such cracks at just under five years old. It didn't work but fortunately the service spotted more across the roof joint between the rear and roof panel. The whole end was replaced under warranty. But yours is a recognised problem and I think Swift can supply a conformal corner cover part that just bonds on to the original one. There used to be a number of pictures on Swift Talk but they may be on other caravan websites or CMHC Together.


Search with this and you get some useful hits "Swift rear roof corner cracks"

On Ebay too a la picture

s-l640.jpg
 
Last edited:
May 10, 2020
227
125
4,635
Visit site
Marvellous thanks for that. The cracks I have are no more then an inch long. Would you know what adhesive would be used to bond the corner panels on?
 
Nov 11, 2009
20,395
6,263
50,935
Visit site
Marvellous thanks for that. The cracks I have are no more then an inch long. Would you know what adhesive would be used to bond the corner panels on?
Probably one of the caravan bodywork adhesives like Soudal. Before fitting a new corner cap cover I would use a very fine drill to make a hole at both ends of your existing cracks that will stop them progressing under the new corner caps.
 
Oct 17, 2010
1,231
470
19,435
Visit site
I tried the same on my Sprite which developed such cracks at just under five years old. It didn't work but fortunately the service spotted more across the roof joint between the rear and roof panel. The whole end was replaced under warranty. But yours is a recognised problem and I think Swift can supply a conformal corner cover part that just bonds on to the original one. There used to be a number of pictures on Swift Talk but they may be on other caravan websites or CMHC Together.


Search with this and you get some useful hits "Swift rear roof corner cracks"

On Ebay too a la picture

View attachment 2504
Had these fitted to my Swift 6 Years ago. As has been said. stop the split, my splits were small, opened up slightly, then filled with Sikaflex 512 then cap sealed on with the sika flex. Make sure you seal well around the marker lights. 6 years still ok.
 
May 10, 2020
227
125
4,635
Visit site
I would be wary about using Captain Tolley on a visible surface. I find with age it yellows.
Yes as I am lead to understand. My intention is to vee out the top of the crack , drill a hole at it’s end , use Captain Tolleys then once cured, fill with a quality epoxy purpose made for plastic. I understand that this may not work but I believe worth a try as the cracks are very small and not leaking water as yet. The cracks run from the high level lights for about an inch towards the rear of the van. Not sure if the bond on end caps would cover this area.
Regards
R
 

JTQ

May 7, 2005
3,333
1,148
20,935
Visit site
The plastic has cracked because it was stressed, with a very high probability that the stress was driven by structural movement from the vehicle flexing whist being towed or expansion from temperature changes,
But most importantly, stress that will forever be around, thus your proposed rather ridged repair faces near certain return of cracking, at or near to it. [A case IMO of vans being made with totally unsuitable products for this application.]

The better way to is to "live" with stresses by using a sealing compliant patch over the crack, the only action on the crack being to try to avert its propagation by drilling a nice big hole just beyond its root.
The patch is far better to be bonded with a compliant "adhesive", so a decent thickness of an elastic bonding product; not a squeezed out solidly locked up patch.
 
  • Like
Reactions: DaveA1
Nov 11, 2009
20,395
6,263
50,935
Visit site
The plastic has cracked because it was stressed, with a very high probability that the stress was driven by structural movement from the vehicle flexing whist being towed or expansion from temperature changes,
But most importantly, stress that will forever be around, thus your proposed rather ridged repair faces near certain return of cracking, at or near to it. [A case IMO of vans being made with totally unsuitable products for this application.]

The better way to is to "live" with stresses by using a sealing compliant patch over the crack, the only action on the crack being to try to avert its propagation by drilling a nice big hole just beyond its root.
The patch is far better to be bonded with a compliant "adhesive", so a decent thickness of an elastic bonding product; not a squeezed out solidly locked up patch.
I agree in my post #2 I said that I tried a similar approach to that proposed by the OP but it didn’t work. What could be feasible is to stop the cracks and use a good weatherproof tape such as Eternabond or Rooflock. Both are incredibly adhesive and will flex.
 
  • Like
Reactions: JTQ

JTQ

May 7, 2005
3,333
1,148
20,935
Visit site
I agree in my post #2 I said that I tried a similar approach to that proposed by the OP but it didn’t work. What could be feasible is to stop the cracks and use a good weatherproof tape such as Eternabond or Rooflock. Both are incredibly adhesive and will flex.

Unfortunately, without the benefit of a technical background it appears the focus is always far more to addressing the cosmetics, rather than the inherent problem.
 
Nov 11, 2009
20,395
6,263
50,935
Visit site
Unfortunately, without the benefit of a technical background it appears the focus is always far more to addressing the cosmetics, rather than the inherent problem.
I guess being a Chartered Mechanical and Marine engineer and doing post grad research into bonding birefringent coatings onto high strained thin aluminium I didn’t address the problem correctly. Naughty step for me then.
 
Oct 17, 2010
1,231
470
19,435
Visit site
Below shows a cap in position. Using a flexible adhesive sealant like Sikaflex allows for movement, should there be any
 

Attachments

  • Cap Van.jpg
    Cap Van.jpg
    94.7 KB · Views: 24
  • Like
Reactions: Jcloughie

JTQ

May 7, 2005
3,333
1,148
20,935
Visit site
I guess being a Chartered Mechanical and Marine engineer and doing post grad research into bonding birefringent coatings onto high strained thin aluminium I didn’t address the problem correctly. Naughty step for me then.

:unsure:???? There I was thinking I was simply agreeing with you.

It was just commenting on those unfortunate not be to as technically advantaged, seeking more a cosmetic solution and as we both know by that, missing a viable solution.

Seem the old adage re "assume", has bitten again here.
 
  • Like
Reactions: otherclive
Nov 11, 2009
20,395
6,263
50,935
Visit site
I successfully used Plast Aid acrylic and pvc repair kit on a bathroom vanity unit where the previous owners had broken the lower section into quite a number of small pieces. Jigsaw like they had tried to use instant adhesive without much success. I reinforced the parts from behind using Milliput, then used Plastaid to bond the front surface and develop a conformal surface between the two adjacent us damaged areas. It bonds to acrylic brilliantly. Readily available from a number of outlets.

https://www.repairingproducts.co.uk/product/plast-aid-acrylic-pvc-multi-purpose-repair-kit-1-5oz/
 
  • Like
Reactions: Ferrodo
May 10, 2020
227
125
4,635
Visit site
I successfully used Plast Aid acrylic and pvc repair kit on a bathroom vanity unit where the previous owners had broken the lower section into quite a number of small pieces. Jigsaw like they had tried to use instant adhesive without much success. I reinforced the parts from behind using Milliput, then used Plastaid to bond the front surface and develop a conformal surface between the two adjacent us damaged areas. It bonds to acrylic brilliantly. Readily available from a number of outlets.

https://www.repairingproducts.co.uk/product/plast-aid-acrylic-pvc-multi-purpose-repair-kit-1-5oz/
I used a similar product on a broken motorcycle fairing with excellent results. Thanks
 

TRENDING THREADS

Latest posts