HELP ☹️😭😭

Mar 6, 2022
5
1
4,515
Hi, guys
I have a 2007 Bailey Pageant. Owned for 4yrs, it's been in storage for a year with out been touched. Our fault entirely ( been running away to Thailand when ever we got chance).
Apart from the usual shut which occurred in November 2024 not attended the van at all 🥺.
Anyway long story short. At the weekend took it out of storage and put it on our drive.
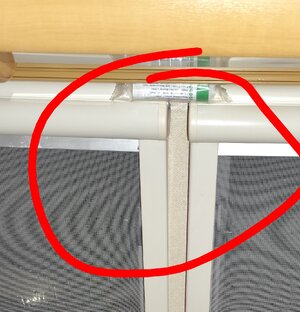
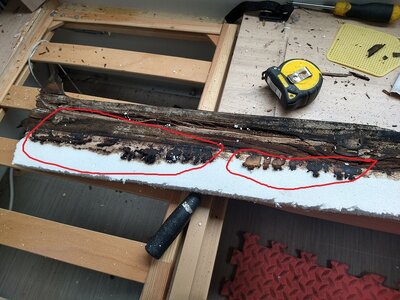
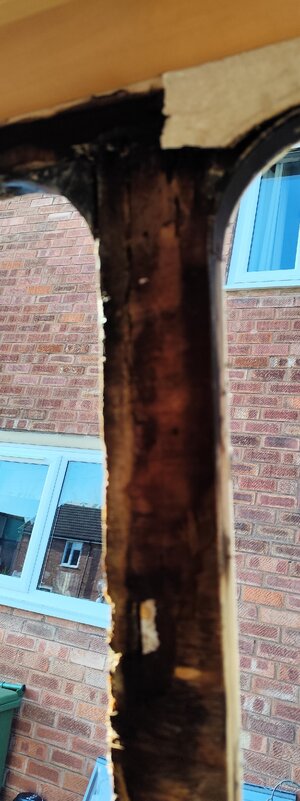
On close inspection found soft wall ( see pic) about 3" at the top of window.
My question is is it DIYable?
I am a fairly hands on guy, understand I need to find source of leak, reseal, cut out and replace.
OR does anyone have idea of cost?
Thanks guys
 

Attachments

  • 1000004315.jpg
    1000004315.jpg
    694.8 KB · Views: 18
Sep 23, 2023
1,473
653
2,435
It doesn't look a formidable or life threating problem Brewster,if you look on this forum under Abbey I've put images of awning rail removal,cleaning and the correct sealer,if you need any more info there will be other articles on here.Good luck ...Gary
 
Apr 23, 2024
636
513
1,135
Welcome to the forum. A commercial organisation would charge anywhere from £1000 to £3500! as damp can be more extensive than what appears on the surface, The vinyl wallpaper ( which has a large plastic content) on the wallboard holds back the damp for a long time before it becomes visible. To do it DIY , yes its possible but may be a bigger job than you first imagine. Lots of forum members on this and other forums have posted their efforts ( with success) so before starting search and search for these threads also youtube has some good videos by DIYer one such is
View: https://www.youtube.com/watch?v=wYn4jGKuEHU
Its a repair on a roof but it shows how a typical caravan structure is built . One tip I can give is that you are unlikely to source identical wallboard in such an old caravan instead, when replacing use 3.6mm plywood and vinyl wallpaper rather than buying caravan wallboard .I use PVA glue to attach the wallpaper to the plywood rather tha wallpaper paste and cut 20mm strips of the wallpaper to make the joint cover strip, again glued with PVA glue. I get the closest match of wallpaper from Park and Leisure ltd who supply to static caravan industry Attached is a photo of the upper window frame removed from a caravan (Elddis Xplore) which had 'just a few high readings around the front window when serviced in 2024. The circled areas aren't wood its actually mould /fungus growth ! So the damp had been going on for a long time - caused by the sealing failure of the window hinge bar allowing water in through the screw holes
 

Attachments

  • Top window frame  lh side -marked up -001-s.jpg
    Top window frame lh side -marked up -001-s.jpg
    338.8 KB · Views: 7
Sep 23, 2023
1,473
653
2,435
Ian ,a few years ago I too repaired the front windows timbers of an elldis (wandahome Tb 18 app year circa 2018).my opinion it was a design fault due production procedures.perhaps a well built caravan dampness maybe not be such a drastic problem,as you say it may be worse than can be seen, hopefully for Brewster at the age of his caravan it may not be terminal and practical to repair it,it's not rocket size although it's important not to lessen it's structural integrity
 
Jan 3, 2012
11,260
2,659
40,935
It doesn't look a formidable or life threating problem Brewster,if you look on this forum under Abbey I've put images of awning rail removal,cleaning and the correct sealer,if you need any more info there will be other articles on here.Good luck ...Gary
And what a great job you did with that (y)
 
Sep 23, 2023
1,473
653
2,435
And what a great job you did with that (y)
Thanks,done a few more odds n sods,a wireless and speakers,removed the remaining MDF,made some other curtains etc.and moved the status box.240 v ceiling light fitted(60 watt halogen lamp removed and replaced with two equivalent LED lamps(equivalent lumines)
 
  • Like
Reactions: Hutch
Mar 6, 2022
5
1
4,515
It doesn't look a formidable or life threating problem Brewster,if you look on this forum under Abbey I've put images of awning rail removal,cleaning and the correct sealer,if you need any more info there will be other articles on here.Good luck ...Gary
Thanks for replies guys, decide to take a few days off work and attempt it myself, I'm pretty confident diy'er.
WOW!!!
Doesn't look to bad if a job, but how wrong was.
Further investigation proofed me wrong( as usual).
So need to rebuild, advise is very welcome.
Thanks
1000004338.jpg
 

Attachments

  • 1000004339.jpg
    1000004339.jpg
    1.4 MB · Views: 2
Apr 23, 2024
636
513
1,135
Take lots of picture and measure each piece and make a plan of the front panel.Also measure the shelf and remove , underneath may also be rotted ( there will be thin aluminium, accessed from the gas locker. the way the front panel is attached is that the side walls are fitted , then the complete front panel wooden frame) is offered up and screws inserted from the outside.
The abs/fibreglass front panel is then attached and the awning rails fitted., then the window rubbers fitted .
You will need to cut these screws off.I use PU expanding glue ( Soudal P45) to join new sections of wood together inc the polystyrene infills it set rock hard.
I treat the new wood with Thompsons water seal before fitting them . My previous post also has some advice. Good luck.
 
  • Like
Reactions: toad a caravan
Sep 23, 2023
1,473
653
2,435
It appears that the leak has been there for years,I agree with Ian, given on what evidence the images show.In some instances caravan construction start's with with the floor mounted on the chassis,followed by each side,then both ends.the aluminium side panels are fitted,usually in sections that overlap one another,(the roof then over laps them). aluminium awning rails etc with sealant applied are then screwed on over the joints, these are then covered with Herzim strip strip(comes in various widths),I hope this is useful information if you decide to repair your caravan,I would suggest that taking your time,a bit of skill and correct materials will pay dividends.Firsty try to determine where the rotted timber finishes/starts00 INFO  _010345 (1).jpg
 

TRENDING THREADS

Latest posts