Old caravan do-up project - advice needed

Page 2 - Passionate about caravans & motorhome? Join our community to share that passion with a global audience!
Mar 14, 2005
18,301
3,587
50,935
Visit site
Hello TpX thinnr,

I get the distinct impression from your replies and comments, that your struggling to understand the scale and what necessary work is required to bring the caravan back into safe and usable condition.

Some of your most recent comments read as though your going to basically cover up the bad bits and go ahead and use it as is.

I can't condone that approach for two reasons, both of which have been mentioned in previous replies you have recieved, but you may not have appreciated their importance.

The first point regards the structural integrity of the caravan. With the extent of the rot you have uncovered, it posses the very real concern about how much is really there, and what its done to the strength of the caravan.
Also when the evidence does appear it frequently does not directly relate to the location of the source of the damp. It's a bad plan to repair the effects of water ingress unless you identify and also repair the cause of the damp

When you first see the evidence of damp inside a caravan it means it's been going on for quite a long time but hidden. This is because the internal wall boards usually have a vinyl wall covering that delays the appearance of signs of damp.

Clearly you have an older caravan, and there is extensive evidence of damp, but in reality you (and neither do we) don't know how much there is, but its very likely to have compromised the strength of the caravans walls and roof. This might make the caravan unsafe to tow.

The issue of toxicity of fungal spoors has also been raised. This is a potential health risk for adults but it's even more a risk for children.

Due to the age and condition of the caravan, I have real concerns about the condition of the appliances in the caravan. I note you tell us you have connected a gas cylinder and you report all the gas equipment functions, but how do you know their working correctly, yet alone safely. When was the caravan last checked by a professional for gas safety? And similarly for the electrics.

I urge you to use your head not your heart when considering using the caravan.
 
Jun 14, 2023
20
2
15
Visit site
I appreciate that I may have given the impression that I'm trying to cut corners but I have also arranged for a caravan service engineer to inspect prior to attempting to take it anywhere.

I unfortunately neither have the expertise or time to completely restore the van as I've seen done by various YouTubers and am therefore compromise is inevitable. If the vehicle is deemed unsafe I will of course not use it .

Probably shouldn't have chucked the money at it first but it is what it is!
 
Jun 14, 2023
20
2
15
Visit site
Morning,

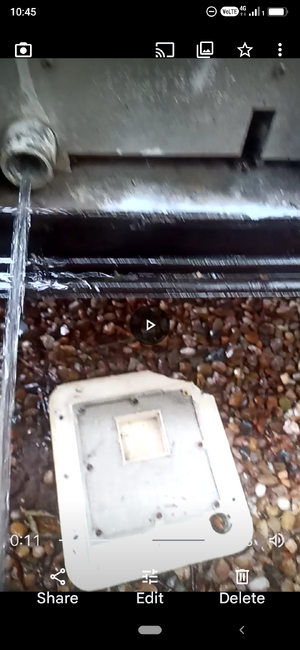
Please see attached video. I've just tried to set up and work the whale watermaster pump with the Aquaroll and the pump activates but leaks out of the hole to the right of it. If poss please advise on what you think might be the issue/how to resolve.

Many thanks.

I'm aware the lid over the pump inlet is missing but assumed it. The cover to thing to the right of the pump is broken and not attached.Screenshot_20230808-104503.png

Please advise if poss. Thanks.
 
Mar 14, 2005
18,301
3,587
50,935
Visit site
Afternoon TPX,

The video does not seem to work, However the appliance you has shown with water pouring out is a Carver Cascade 2 Gas (and might also be an Electric) water heater, and the water is flowing out of the drain plug hole.

Judging by the projection of the water and its columnated nature, it suggests your pump is working well and the the Cascades inlet Non Return Valve is not adversely restricting it, so that so far looks good. But there is a tell tale stain on the metal plate above the drain port protrusion, which might indicate the heaters pressure relief valve which is directly above the drain port has dripped on a number of occasions - its probably nothing to be unduely concerned about.

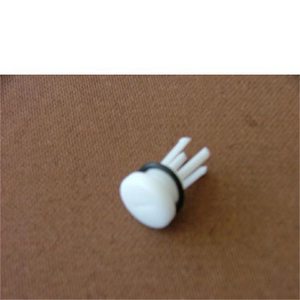
You should have a drain plug for the heater that looks like this
1691499368419.png
 
Jan 19, 2002
1,636
492
19,935
Visit site
Seems there are two types pre 1987 has a ‘+’ in the top and not the three ‘legs’ on the end, while after that date a ‘- ‘ and as illustrated by ProfJohn in his post. Several sellers on EBay advertise either.
 
Jun 14, 2023
20
2
15
Visit site
Thanks gents. Just bought a post 87 one an hour before seeing the last reply! Is it worth trying that one or will it not be suitable do you think?
 
Jun 14, 2023
20
2
15
Visit site
Update, the drain plug and new filter have stopped the leaking and is now seemingly working, not sure how long I need to leave the boiler on to heat some water though? Does the pump store water in the system or just use whatever is needed whilst the taps are on?

Bloke at the shop said to connect the pump, turn the taps on, let the water be drawn in and once the system full then turn the boiler on but by the time I'd run the taps to get water round the van the 40l Aquaroll was basically empty so the taps weren't running as fast.

If poss please advise on getting water heater and if it stays in the system.

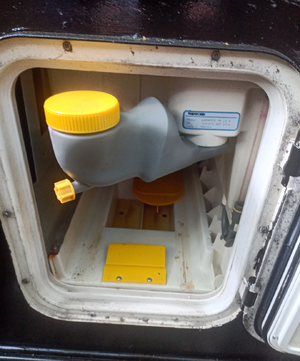
Also with the toilet cassette the gent said to pour the pink liquid in a separate flap and the blue into the cassette. The only thing it looks like I could pour pink into is this with the yellow lid>
Screenshot_20230808-184056~2.png

Is that the right bit for it please?
 
Jan 19, 2002
1,636
492
19,935
Visit site
Yup the yellow cap gives access to the flush water reserve - actually pink stuff is not necessary but can make flushing easier but not everyone likes the floral scents. The small knob below the top yellow cap is for winter drainage - into a bucket or the like. A lot of us use a plastic watering can to avoid spills when filling.
Do not pour the blue through the flush hole but through the emptying spout - now formaldehyde is not used it may be less important - but it can cause the seal to wrinkle and distort and are expensive to replace.
As for the water you purge the system by opening the furthest tap turned to hot until it runs smooth, then the other taps, then the same for the cold. (Of course your waste container will need to be in place!) It will use most of the aquaroll! Then you can turn on the water heater. You are right as you use the water the pump runs refilling the system. Don’t forget to drain the tank before towing.
 
Jun 14, 2023
20
2
15
Visit site
Hot water achieved! Everything water-wise seems to be working fine now.

Thanks so much for all your help today.

Looks like we should now be set to be able to get away by the weekend.

Cheers!
 
Mar 14, 2005
18,301
3,587
50,935
Visit site
Look up the user instructions for the appliances you have, Many can be found on line in PDF format and free to download.
 
Mar 14, 2005
1,160
44
19,185
Visit site
Regards filter/filter housing, look up Filtapac ltd, they've been making both for years, eBay's a good start. Trick with these is use a little silicone grease on filters o-ring and threads first a drop of fairy if your pushed, but NEVER Vaseline!
As for cascade, this is my overview, how it works and why it doesn't, it'll print on an A4 sheet

The Carver Cascade 2 is a 9 litre storage water heater, which when running on gas will heat the water to 65deg c in about 45 minutes. On 240V mains assuming it has this facility, the time can be somewhat longer or shorter depending on the wattage (630w 3amp to 840w 5amp) of the element fitted, you can use both gas and electric together for faster times.
To operate the gas there is a wall switch or a switch within a main control panel, either way both have three lights green, amber and red. When switched on the green lights, (water tank must be full, i.e. water coming from hot taps), if it stays on after about 8 seconds then the gas has lit and all is well. If the green is joined by the red then you may have a problem, but if the gas bottle has just been changed then air in the pipes will have to be bled through by repeating the above 2 or 3 times. Once lit, and it should light without any pops and bangs, (this would indicate it needs a service), the heater looks after itself and gives constant hot water. Any problems will cause it to shut down safely and show the red light. Forget the amber light, it's to show low voltage and won't light unless the voltage is so low the heater and everything else packed up long since, though you may notice it 'flash' as the switch is turned on or off.
The 240v immersion heater if fitted is totally separate, and lies behind a white plastic box on the inboard end of the water tank. It is controlled by a switch, often close by and at floor level, but again sometimes as part of a remote control panel. The switch has a red light to show it's 'on', not that it's working, this will be determined by the water getting hot. If it does not then it may have 'tripped' Two types exist, early circa 1990 are non-re-settable but are repairable. Later models have a Red button on the end of the plastic box which is sometimes behind a little flap. Switch off mains, and press to reset.
Other faults concerning the gas side very often come down to the 'Burner Module'. This handy little unit contains the burner, gas valve and all the electronics which control it and is accessible from behind the cover outside of the van. In the event things go wrong it's a 5 minute job to replace it, with a new or serviced exchange unit. One other safety device is a wax filled 'fusible' plug, this again is behind the outer cover and shows itself as a 13 mm nut set in the fins above the burner. The wax will melt if things get too hot allowing hot water from the tank to spray over the burner and put the flame out. This will render things safe but will require a new module because it's control circuitry is faulty. However given if the fuse 'blows' without the water apparently getting to hot then replacing the plug will be sufficient. The point to note here is that over time the wax in the plug degrades or the threads leak, at the very least allowing water to seep onto the burner causing it to rust and eventually will still require replacement of the whole burner module.
Further problems that come to light in spring is the discovery of frost damage to the water tank, the non-return valve which is part of the cold water inlet and other plastic fittings. Failing to drain the heater when there is a chance of temperatures dropping below freezing can be very expensive to repair and should be avoided by removing the drain bung and allowing the heater to drain completely. Later models have a valve above the drain hole in the top left corner of the flue cowl, these have a 'toggle' showing that when turned a ¼ in any direction will allow air into the tank and assist the draining. Older models still have the valve but the flue cowl needs to be removed and the valve end pulled to open it, in this case opening all taps in the van will do much the same thing. It is most important that the drain bung is then only placed back into the hole and not screwed in, any water left in the system can then drain away.
Frost damage to the tank will be obvious by the leaking water from the damaged seal, the damaged non-return valve quite often will prevent water coming from the hot taps although the cold water flow will be fine. Other fittings are often cracked by the pressure of the frozen water and will leak on refilling the system.
 
Mar 14, 2005
18,301
3,587
50,935
Visit site
Gary,

What has happened to "arcystems.biz" I now get error 404 site not found?

Edit Opps should be "arcsystems.biz"
 
Last edited:
Mar 14, 2005
1,160
44
19,185
Visit site
Gary,

What has happened to "arcystems.biz" I now get error 404 site not found?
Hi John hope your well?
As for the website, it's been a sore point of late but you'll find it's now back up and running for the time being at least. Handy for this thread as it happens, there being a link to a printable Cascade2 manual on the front page 👍
 
Aug 12, 2023
540
234
1,135
Visit site
Update, the drain plug and new filter have stopped the leaking and is now seemingly working, not sure how long I need to leave the boiler on to heat some water though? Does the pump store water in the system or just use whatever is needed whilst the taps are on?

Bloke at the shop said to connect the pump, turn the taps on, let the water be drawn in and once the system full then turn the boiler on but by the time I'd run the taps to get water round the van the 40l Aquaroll was basically empty so the taps weren't running as fast.

If poss please advise on getting water heater and if it stays in the system.

Also with the toilet cassette the gent said to pour the pink liquid in a separate flap and the blue into the cassette. The only thing it looks like I could pour pink into is this with the yellow lid>
View attachment 5302

Is that the right bit for it please?
We have same system. The right hand clear pipe is fill indicator for flush water reservoir. To drain reservoir totally disconnect clear pipe at top and point downwards. Not something you do regular but given state of your caravan probably needs a good flush.
Before using toilet, place 2L water in toilet cassette via toilet bowl along with 70ml of blue stuff. Then topup the flush tank through yellow cap, pink stuff optional.
 

TRENDING THREADS

Latest posts