- Sep 26, 2018
- 716
- 270
- 11,135
At the end of our last trip (15th June) our nearside bedroom blind "packed up" - in that one of the strings broke and we couldn't get one side of the blind up...
I considered a number of courses of action; getting the dealer to repair, replacing the blind (£139 delivery not until August) or try myself. I opted for the final one on the basis that I still had the other two open to me. At the time I didn't know what the blind was, but found some stuff on YouTube that gave me a bit of confidence.
I removed the blind unit (not straight forward given that there is a shelf for the curtain rail above the unit and that prevents access to the top two screws). Removal of the shelf, the four corner covers, then the four screws and the blind was in the back of the car.
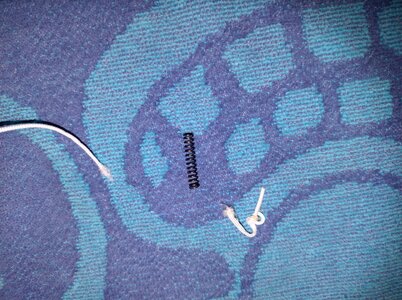
Now the reason was clear as this:
fell out of the blind... a real cheapo biro spring that had chafed through the cord
Arriving home and dismantling, it was obvious that the blind was totally different to those on YouTube. If I had the skills, I would have done a video, but as I haven't it's all words.

There are two rails and the two sides with corner joints. This is the first curve ball. Each corner has FOUR screws, and on examination these are Torx 10... I had a set of Torx bits BUT, curve ball 2, the bit holder is too wide, you deffo need a normal screwdriver Torx10 screw driver, and while you're shopping get yourself a 1.5mm Allen key, and at least 5 metres of 1.0mm braided polyester line.
Once the screws are out, finagle the corner joints apart - off the ends of the bottom and top rails is the main thing. The the reaons for the 1.5mm key becomes apparent:

These "fittings" are the "other end" securing points for the strings. There are two per side (one for the flyscreen, one for the blind) and the central hole contains a grub screw that requires the 1.5mm Allen key! You have to remove the one for the busted string in order to be able to attach the new string. There's a dimple in the plastic under the fitting, place a biro mark on the visible bit above, as it only goes in one place.
Now you can start fitting the new string.... If you only have one broken string, just follow the routing on the other side. For the Blind it goes to the top rail through a hole and then down through the hole slightly further inside. It's then fed through holes in the pleats of the fly screen (a bit fiddly) leading to the end of the top alloy bar of the blind. These bars have end fittings that only fit one way. They have a slot into which all the lines that pass them (both white and black) must pass, but the white line has to pass through a moulded hole to pass along the top bar, towards the far side of the top bar (in the pic below the side rail is on the right.

The line goes around the little fitting (down/up/down) is fed through the tabs on the pleats and ends up at the plastic bottom rail, there are holes, and the cord is fed through those holes and can now be cut off ensuring you have left LOADS of spare - before cutting get everything sort of back where it would be but not assembled, then check another few times BEFORE YOU CUT!
Now you need to start the reassembly. This is fiddly. There are locating pegs and lugs on each face of the corner brackets, so make sure you assemble one corner at a time. The little tabs for the short screws are actually two parts, and each goes either side of the element they are attaching to, so the screw goes through corner tab, element hole, second part of corner piece...
Okay we're nearly there but don't think you're done yet. All the corner bits are done (properly, all screw are in...). All you have to do now is to get the length of the spring end of the cord the right length, and that takes a lot of fiddling around. The spring goes onto the string, and then there is a tiny washer (to stop the string pulling through. I used a technique where I tied a slip knot in what I thought was the right place. The reason for that is that it's easy to untie and re-tie a slip knot. Once you're happy you can then thread the end of the string through the loop of the slip knot and your job is done, but I must have retied the slipknot 20 times at least!
Hope this helps any other Remis Remibase II owners, don't hesitate to ask questions. By the way, my final bill is less than a tenner for the Torx10 and the string.
I considered a number of courses of action; getting the dealer to repair, replacing the blind (£139 delivery not until August) or try myself. I opted for the final one on the basis that I still had the other two open to me. At the time I didn't know what the blind was, but found some stuff on YouTube that gave me a bit of confidence.
I removed the blind unit (not straight forward given that there is a shelf for the curtain rail above the unit and that prevents access to the top two screws). Removal of the shelf, the four corner covers, then the four screws and the blind was in the back of the car.
Now the reason was clear as this:
fell out of the blind... a real cheapo biro spring that had chafed through the cord
Arriving home and dismantling, it was obvious that the blind was totally different to those on YouTube. If I had the skills, I would have done a video, but as I haven't it's all words.
There are two rails and the two sides with corner joints. This is the first curve ball. Each corner has FOUR screws, and on examination these are Torx 10... I had a set of Torx bits BUT, curve ball 2, the bit holder is too wide, you deffo need a normal screwdriver Torx10 screw driver, and while you're shopping get yourself a 1.5mm Allen key, and at least 5 metres of 1.0mm braided polyester line.
Once the screws are out, finagle the corner joints apart - off the ends of the bottom and top rails is the main thing. The the reaons for the 1.5mm key becomes apparent:
These "fittings" are the "other end" securing points for the strings. There are two per side (one for the flyscreen, one for the blind) and the central hole contains a grub screw that requires the 1.5mm Allen key! You have to remove the one for the busted string in order to be able to attach the new string. There's a dimple in the plastic under the fitting, place a biro mark on the visible bit above, as it only goes in one place.
Now you can start fitting the new string.... If you only have one broken string, just follow the routing on the other side. For the Blind it goes to the top rail through a hole and then down through the hole slightly further inside. It's then fed through holes in the pleats of the fly screen (a bit fiddly) leading to the end of the top alloy bar of the blind. These bars have end fittings that only fit one way. They have a slot into which all the lines that pass them (both white and black) must pass, but the white line has to pass through a moulded hole to pass along the top bar, towards the far side of the top bar (in the pic below the side rail is on the right.
The line goes around the little fitting (down/up/down) is fed through the tabs on the pleats and ends up at the plastic bottom rail, there are holes, and the cord is fed through those holes and can now be cut off ensuring you have left LOADS of spare - before cutting get everything sort of back where it would be but not assembled, then check another few times BEFORE YOU CUT!
Now you need to start the reassembly. This is fiddly. There are locating pegs and lugs on each face of the corner brackets, so make sure you assemble one corner at a time. The little tabs for the short screws are actually two parts, and each goes either side of the element they are attaching to, so the screw goes through corner tab, element hole, second part of corner piece...
Okay we're nearly there but don't think you're done yet. All the corner bits are done (properly, all screw are in...). All you have to do now is to get the length of the spring end of the cord the right length, and that takes a lot of fiddling around. The spring goes onto the string, and then there is a tiny washer (to stop the string pulling through. I used a technique where I tied a slip knot in what I thought was the right place. The reason for that is that it's easy to untie and re-tie a slip knot. Once you're happy you can then thread the end of the string through the loop of the slip knot and your job is done, but I must have retied the slipknot 20 times at least!
Hope this helps any other Remis Remibase II owners, don't hesitate to ask questions. By the way, my final bill is less than a tenner for the Torx10 and the string.