Whale iVan screen repair/replacement

Jul 19, 2021
566
383
5,135
Visit site
My iVan screen has been a pain since day one, generally unresponsive needing a very firm push on the touch screen to get it to register.
At the end of last year the screen developed lines running horizontal and vertical then black areas then unreadable areas.
Sometimes you could get the image back by pushing on the frame, but this also became more difficult.
A weekend away in February this year saw the screen hardly useable. As we are lending the caravan to my daughter and her partner for a week's holiday soon I needed to fix it.
With replacement units costing £400 or more , if you can even find one, I needed to find a cheaper and available solution.
With nothing to lose I decided to get my screwdriver out.

** Attempt this at your own risk, I am not liable if you screw it up **

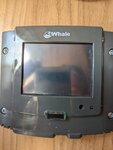
1- remove the outer trim to reveal 4 retaining screws (this is the screen powered on, as you can see totally black)
PXL_20230310_161956549_copy_767x1020.jpg

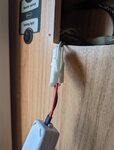
2- pull the unit out and unclip the cable
PXL_20230310_162103567_copy_770x1022.jpg

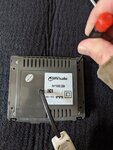
3-put the screen face down on a soft cloth and undo the 4 screws
PXL_20230310_162138359_copy_658x874.jpg

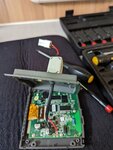
5- gently pull through the black cable to reveal the PCB
PXL_20230310_162230815_copy_744x988.jpg
6-undo the 5 screws holding the PCB in place, then very carefully push the tabs on the ribbon cable socket , I can't stress how carefully you must do this, break the tabs and it's a whole world of pain , just slide them towards the edge a bit at a timePXL_20230310_162258938_copy_658x875.jpg
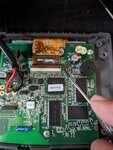
7- remove the foam pad from the back of the old screen and place on the new one, then route the ribbon cable of the new screen into the socket and gently push the clips closed again
(Part number showing incase you need the same, new part is the bottom one)
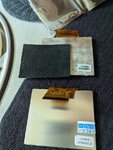
PXL_20230310_162500643_copy_675x897.jpg
8-As per all the great manuals, refitting is the reverse of dismantling 😂
10-test it. In my case it looks better than new, and requires only the lightest of touches
PXL_20230310_163222705_copy_726x964.jpg


I purchased my screen from https://www.invshop.com/mobile/new-35inch-320240-lcd-display-et035009dh6-23586.html
Cost was £95 shipped and took about 5 days from China, with great communication from them. I think you might be able to get them cheaper elsewhere, but I needed it quickly.

Nice to save myself £300 for the sake of 20 minutes work, most of which would need to be done if replacing the unit anyway
 
Last edited:
Jul 19, 2021
566
383
5,135
Visit site
I think that the fault is caused by corrosion on the ribbon connection at the screen end or some dry solder joints.
When I get chance I am going to strip the faulty screen and poke around to see if it can be a spare
 
Jun 16, 2020
5,032
2,097
11,935
Visit site
Good for you. Its great when someone ‘beats the system’. So well done.

I have a similar problem with my smart home thermostat. It comes with a hub and has .to be replaced as a pair. Not as bad as Whale. About £175 for both. But that is because it is domestic and not caravan prices.

The screen on mine is unreaddable. But otherwise it all works, and the information can be seen on the iPad.

I contacted the manufacturer. It is out of warrentee, but they have offered to fix it for free, I just need to cover postage to Paris.

Like you I did some research. I can get a new screen which fits just like yours, £17 from China.

I will post it to Paris, as it is then their responcibility to get it right.

John
 
  • Like
Reactions: Bluetonic
Jul 19, 2021
566
383
5,135
Visit site
Just a small update
1- There is a felt type material "frame" around the original screen, this needs to be carefully removed from the old screen and attached to the new one to prevent the screen wobbling
2-I dismantled the oldscreen, but there is no way to fix the ribbon cable that I can see, it is bonded to the screen somehow. Kind of makes me feel better about spending out on the new one
 
Mar 14, 2005
18,131
3,425
50,935
Visit site
My iVan screen has been a pain since day one, generally unresponsive needing a very firm push on the touch screen to get it to register.
At the end of last year the screen developed lines running horizontal and vertical then black areas then unreadable areas.
Sometimes you could get the image back by pushing on the frame, but this also became more difficult.
A weekend away in February this year saw the screen hardly useable. As we are lending the caravan to my daughter and her partner for a week's holiday soon I needed to fix it.
With replacement units costing £400 or more , if you can even find one, I needed to find a cheaper and available solution.
With nothing to lose I decided to get my screwdriver out.

** Attempt this at your own risk, I am not liable if you screw it up **

1- remove the outer trim to reveal 4 retaining screws (this is the screen powered on, as you can see totally black)
View attachment 4419

2- pull the unit out and unclip the cable
View attachment 4420

3-put the screen face down on a soft cloth and undo the 4 screws
View attachment 4421

5- gently pull through the black cable to reveal the PCB
View attachment 4422
6-undo the 5 screws holding the PCB in place, then very carefully push the tabs on the ribbon cable socket , I can't stress how carefully you must do this, break the tabs and it's a whole world of pain , just slide them towards the edge a bit at a timeView attachment 4423

7- remove the foam pad from the back of the old screen and place on the new one, then route the ribbon cable of the new screen into the socket and gently push the clips closed again
(Part number showing incase you need the same, new part is the bottom one)
View attachment 4424
8-As per all the great manuals, refitting is the reverse of dismantling 😂
10-test it. In my case it looks better than new, and requires only the lightest of touches
View attachment 4425


I purchased my screen from https://www.invshop.com/mobile/new-35inch-320240-lcd-display-et035009dh6-23586.html
Cost was £95 shipped and took about 5 days from China, with great communication from them. I think you might be able to get them cheaper elsewhere, but I needed it quickly.

Nice to save myself £300 for the sake of 20 minutes work, most of which would need to be done if replacing the unit anyway
A good job, which needed a considerable amount of skil and a suitable soldering iron! Not a job for the feint hearted!

It does raise the question of why do we need such complexity in caravans?
 
  • Like
Reactions: Ferrodo
Jul 19, 2021
566
383
5,135
Visit site
Excellent solution Bluetonic, if there was a 'post of the year' I would vote for this.

Thanks very much.
Just trying to help people save some money in these tough times


A good job, which needed a considerable amount of skil and a suitable soldering iron! Not a job for the feint hearted!

It does raise the question of why do we need such complexity in caravans?

I agree re the complexity, it adds very little to the functionality of the caravan , and has shown itself to be the week link on several occasions now.
I'd much rather have the old on/off toggle switch.

As for the fix, I still believe it's an easy one that anyone that can hold a screwdriver the right way round could do.
No soldering required!
I'm happy to help anyone in the NW Leicestershire area
 
Apr 2, 2023
7
1
15
Visit site
My iVan screen has been a pain since day one, generally unresponsive needing a very firm push on the touch screen to get it to register.
At the end of last year the screen developed lines running horizontal and vertical then black areas then unreadable areas.
Sometimes you could get the image back by pushing on the frame, but this also became more difficult.
A weekend away in February this year saw the screen hardly useable. As we are lending the caravan to my daughter and her partner for a week's holiday soon I needed to fix it.
With replacement units costing £400 or more , if you can even find one, I needed to find a cheaper and available solution.
With nothing to lose I decided to get my screwdriver out.

** Attempt this at your own risk, I am not liable if you screw it up **

1- remove the outer trim to reveal 4 retaining screws (this is the screen powered on, as you can see totally black)
View attachment 4419

2- pull the unit out and unclip the cable
View attachment 4420

3-put the screen face down on a soft cloth and undo the 4 screws
View attachment 4421

5- gently pull through the black cable to reveal the PCB
View attachment 4422
6-undo the 5 screws holding the PCB in place, then very carefully push the tabs on the ribbon cable socket , I can't stress how carefully you must do this, break the tabs and it's a whole world of pain , just slide them towards the edge a bit at a timeView attachment 4423

7- remove the foam pad from the back of the old screen and place on the new one, then route the ribbon cable of the new screen into the socket and gently push the clips closed again
(Part number showing incase you need the same, new part is the bottom one)
View attachment 4424
8-As per all the great manuals, refitting is the reverse of dismantling 😂
10-test it. In my case it looks better than new, and requires only the lightest of touches
View attachment 4425


I purchased my screen from https://www.invshop.com/mobile/new-35inch-320240-lcd-display-et035009dh6-23586.html
Cost was £95 shipped and took about 5 days from China, with great communication from them. I think you might be able to get them cheaper elsewhere, but I needed it quickly.

Nice to save myself £300 for the sake of 20 minutes work, most of which would need to be done if replacing the unit anyway
I appear to have a similar issue on that the screen is not responding to touch!!!

Just checked the link for the part you ordered and next to touchscreen it says without.

Is this definitely what you ordered as am going to have a tinker and then may have to order a new screen ☹️ and don't want to order the wrong one.

Thanks for the awesome post.
 
Jul 19, 2021
566
383
5,135
Visit site
Hi,
I've just checked my order and it was definitely for this item
If you look at this picture you can see the 4 wires that go to the front of the panel for the touch screen matrix.
I think the description is incorrect and I wasn't sure when I first looked.
The company seem pretty responsive to any questions, but you will probably have to wait until Monday for a reply.
Please check the item id on the back of your screen to be sure, I don't know if any changes were made during the production run.
Screenshot_20230402-160734.png

Wish they were as cheap as the screen for a Nintendo DS I just fixed, that was £9 Inc postage.


Best of luck with the repair.
Please let me know how it goes .
 
  • Like
Reactions: CaravannerPaul
Apr 2, 2023
7
1
15
Visit site
Hi,
I've just checked my order and it was definitely for this item
If you look at this picture you can see the 4 wires that go to the front of the panel for the touch screen matrix.
I think the description is incorrect and I wasn't sure when I first looked.
The company seem pretty responsive to any questions, but you will probably have to wait until Monday for a reply.
Please check the item id on the back of your screen to be sure, I don't know if any changes were made during the production run.
View attachment 4491

Wish they were as cheap as the screen for a Nintendo DS I just fixed, that was £9 Inc postage.


Best of luck with the repair.
Please let me know how it goes .
Thanks for coming back to me. Will play about with the contacts first as the screen is still displaying without issue. Failing that shall copy your advice .
 
Apr 2, 2023
7
1
15
Visit site
Massive thanks to you for the thread.

Without the explanation not sure I would have known how to remove or had the confidence to do it as the cover was properly stuck on.

Managed to disconnect it, open it up, remove the screen connection and after giving it a wipe and leaving it in the sun it all seems to be working now.

Have also scored a used control panel off ebay for £25 just in case it happens again and I can't fix it.

Thanks once again. 👍
 
  • Like
Reactions: Bluetonic
Jul 19, 2021
566
383
5,135
Visit site
Massive thanks to you for the thread.

Without the explanation not sure I would have known how to remove or had the confidence to do it as the cover was properly stuck on.

Managed to disconnect it, open it up, remove the screen connection and after giving it a wipe and leaving it in the sun it all seems to be working now.

Have also scored a used control panel off ebay for £25 just in case it happens again and I can't fix it.

Thanks once again. 👍
That's great news, glad you got it working.
I was hoping that mine was going to be corrosion on the cable but unfortunately not.
I should look out for a used one too. That's a good idea
 
Jul 19, 2021
566
383
5,135
Visit site
Many thanks Bluetonic, I’ve just completed a screen repair on my 2013 Bailey Rimini. Fantastic guide and again many thanks.
That's great to hear Woddy.
Hope we get a good few years out of this fix.
Can I ask , did you get the replacement from the same place as I did?
Anything that was missed or could do with better instructions on the guide?

And thanks for letting me know, makes me happy to know that someone ahs saved a few hundred pounds
 
Jun 20, 2023
2
1
15
Visit site
Yes used the link, cost £94. Ordered early Monday arrived this morning Thursday. Full tracking info provided. Only difficulty was removing the felt around the outside of the screen. Got there in the end though. Instructions were clear and easy to follow for me.
thanks again
 
  • Like
Reactions: Bluetonic
Jun 3, 2024
1
1
15
Visit site
My iVan screen has been a pain since day one, generally unresponsive needing a very firm push on the touch screen to get it to register.
At the end of last year the screen developed lines running horizontal and vertical then black areas then unreadable areas.
Sometimes you could get the image back by pushing on the frame, but this also became more difficult.
A weekend away in February this year saw the screen hardly useable. As we are lending the caravan to my daughter and her partner for a week's holiday soon I needed to fix it.
With replacement units costing £400 or more , if you can even find one, I needed to find a cheaper and available solution.
With nothing to lose I decided to get my screwdriver out.

** Attempt this at your own risk, I am not liable if you screw it up **

1- remove the outer trim to reveal 4 retaining screws (this is the screen powered on, as you can see totally black)
View attachment 4419

2- pull the unit out and unclip the cable
View attachment 4420

3-put the screen face down on a soft cloth and undo the 4 screws
View attachment 4421

5- gently pull through the black cable to reveal the PCB
View attachment 4422
6-undo the 5 screws holding the PCB in place, then very carefully push the tabs on the ribbon cable socket , I can't stress how carefully you must do this, break the tabs and it's a whole world of pain , just slide them towards the edge a bit at a timeView attachment 4423

7- remove the foam pad from the back of the old screen and place on the new one, then route the ribbon cable of the new screen into the socket and gently push the clips closed again
(Part number showing incase you need the same, new part is the bottom one)
View attachment 4424
8-As per all the great manuals, refitting is the reverse of dismantling 😂
10-test it. In my case it looks better than new, and requires only the lightest of touches
View attachment 4425


I purchased my screen from https://www.invshop.com/mobile/new-35inch-320240-lcd-display-et035009dh6-23586.html
Cost was £95 shipped and took about 5 days from China, with great communication from them. I think you might be able to get them cheaper elsewhere, but I needed it quickly.

Nice to save myself £300 for the sake of 20 minutes work, most of which would need to be done if replacing the unit anywayI suspected a screen fault.
Hi Bluetonic. Thank you SO much for posting this solution to your Whale Controller screen fault. I have struggled with heating my 2017 Compass Casita since last Autumn. The controller would not respond to me trying to set the CH temperature up above the displayed 5deg C. After 2 calls to Whale Technical Support since, trying to use the red reset buttons and other solutions to fix it, reluctant to order the £400 non-returnable replacement screen unit and not sure of the cause, I resisted until now. I was just about to order one, then I found this :) .

Unfortunately, the link you provided would not work for me, so, after doing a search for the Reference Number thoughtfully shown on the product label photo (ET035009DH6), I came up with a list of suppliers for this (apparent standard 3.5") screen. I have just ordered it (the last one, it seems) from its supplier in China, and look forward to getting it. I am a retired Mech Eng, no electrician, but decided it is worth a try at this price. I already have the unit removed. I am so disappointed to have it fail in the year just after the 5-year warranty period ended. Having read here of others experiencing similar problems so early on, I feel it has not been fit for purpose, given the actual low number of hours of operation.

However, just like my refused claim for a sudden caravan front panel split recently appearing (only 7 years into the supposed 10-year body failure/water ingress warranty), the 'van having travelled nowhere, except the dealership trips (twice!) involving front end removal to fix water ingress/damp, I did not expect any (£) gestures of good will. Thank you again. Malcolm
 
  • Like
Reactions: Bluetonic

TRENDING THREADS

Latest posts