caravan damp repair help

Dec 20, 2018
11
0
0
Visit site
Evening all, 1st post on the site and its one asking for help!

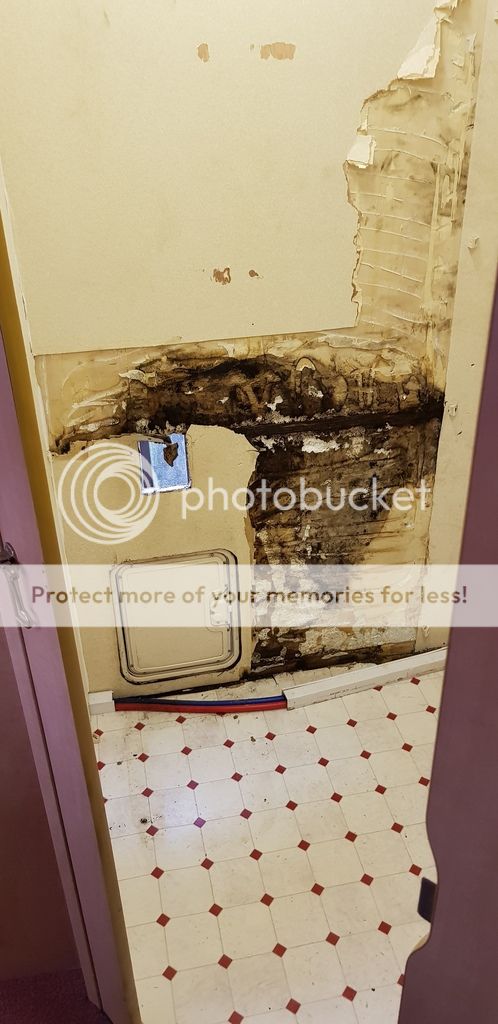
Our bailey has some dampness issues that I have now traced back to the water inlet for the toilet system.

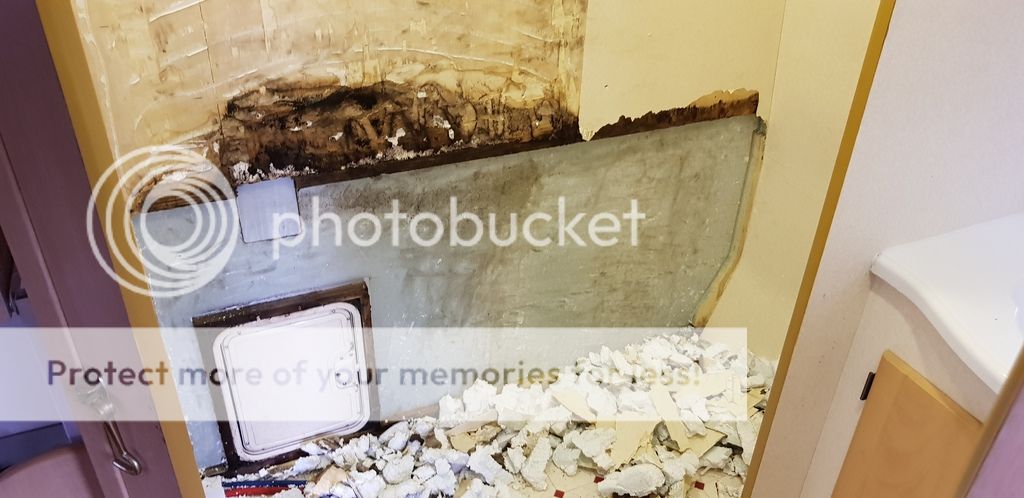
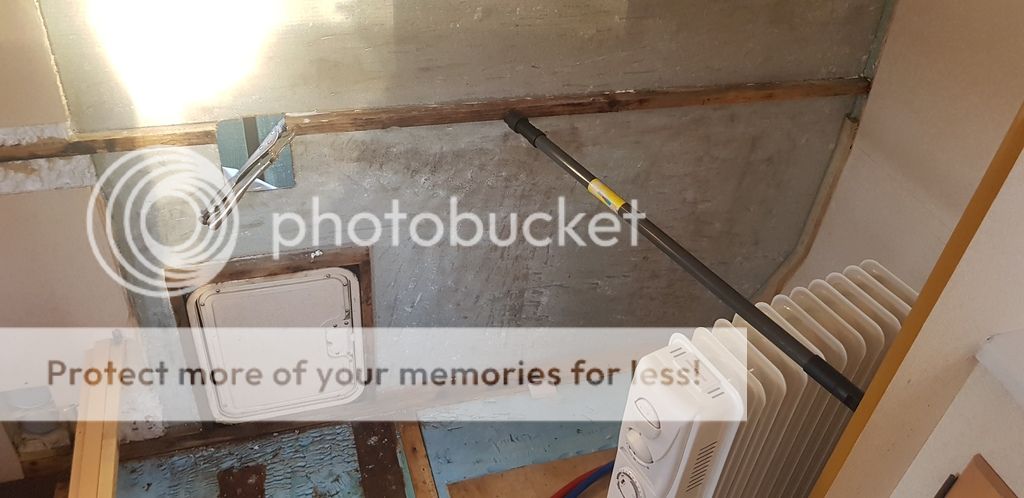
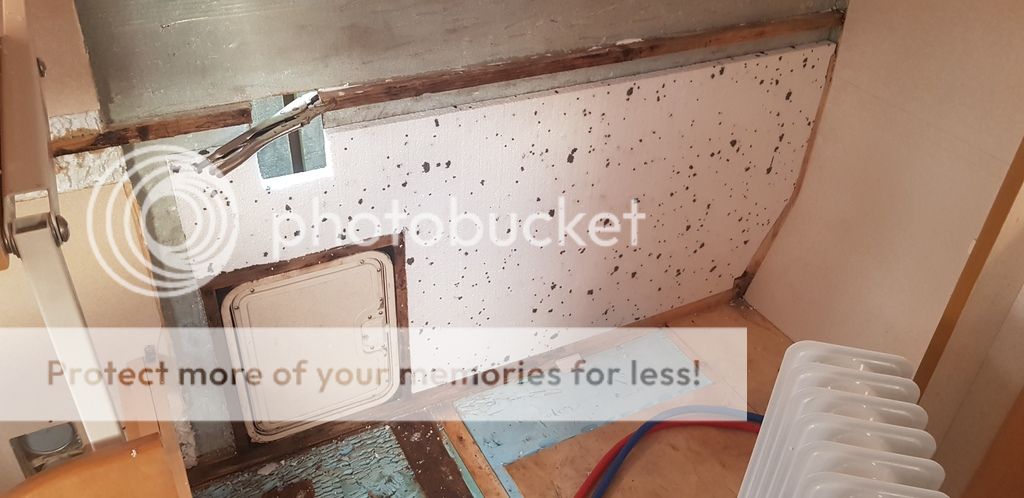
I have stripped out the bathroom cupboard and the internal bathroom wall. This let me strip the plywood off the external wall. It turns out the polystyrene is bonded to the plywood and external wall. I have removed it all now (as it was black, wet and smelled!) and can see the outside layer from the inside. slight mishap with this but i'll show this later, once the embarrassment has passed!

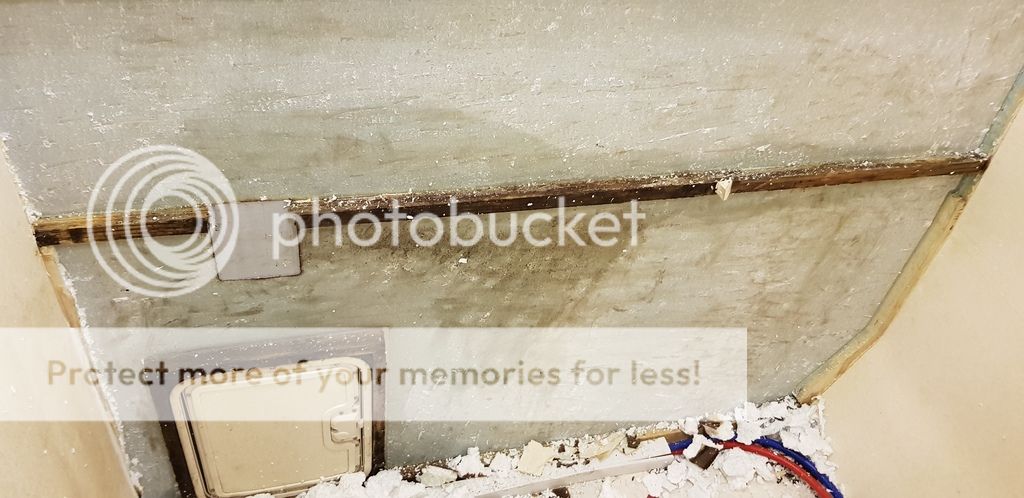
I would like to replace the bit of wood that runs horizontally and ensure the two parts of the outside layer are sealed but I am unsure what I need to achieve this (apart from a bit of 25 mm x 25 mm wood!) any suggestions?

I am planning out buying a sheet of 3mm plywood and 25 mm polystyrene for the wall repairs. What would you suggest I use to bond the polystyrene to the outer layer and then to the plywood? I guess a non solvent, liquid glue of some description

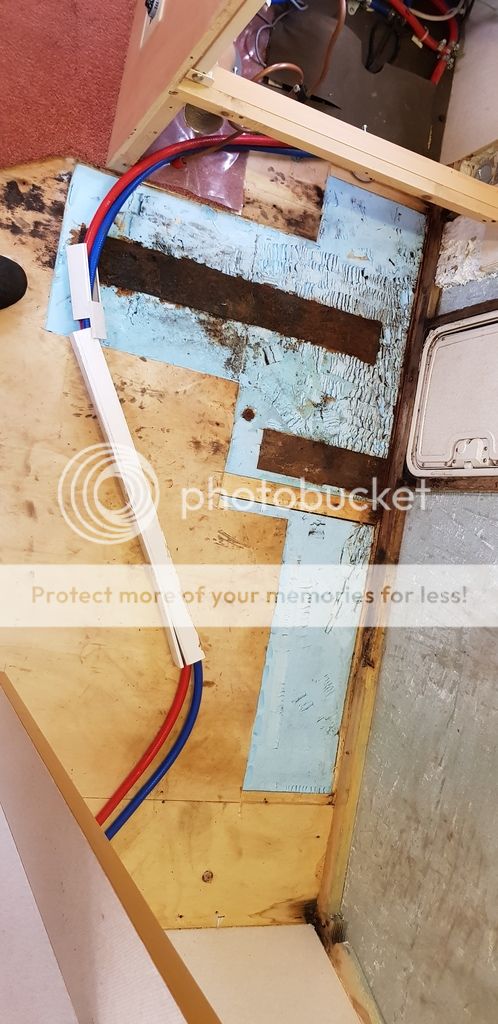
The floor is also damp and I can push a screwdriver through it so was going to cut out and replace this as well. Does anyone know the thickness? I am guessing it is just plywood? marine / outdoor type?

Thank you
David

struggling with pictures - give me 5 or some more help ! trying to use google pics
 
Dec 20, 2018
11
0
0
Visit site
imRxMEqzdfNBpN7K6


[img size = 400]https://photos.app.goo.gl/imRxMEqzdfNBpN7K6[/img]
 
Mar 14, 2005
17,557
3,051
50,935
Visit site
Hello dvdtv,

Sorry you have got this problem.

Your reference to wooden strips, tells me you have an older caravan. This needs to be borne in mind, as damp problems in this type of construction is that visible damp is usually no the full extent of the problem.

Like dry rot in a house it is vitally important that all the affected material is removed back to good material, otherwise the problem can re-assert its self.

I cant advise about the materials to use, just that you need to be very thorough in first identifying the source of the water and fixing it as well as replacing all the affected material.

Good luck
 
Dec 20, 2018
11
0
0
Visit site
Thanks for the reply John

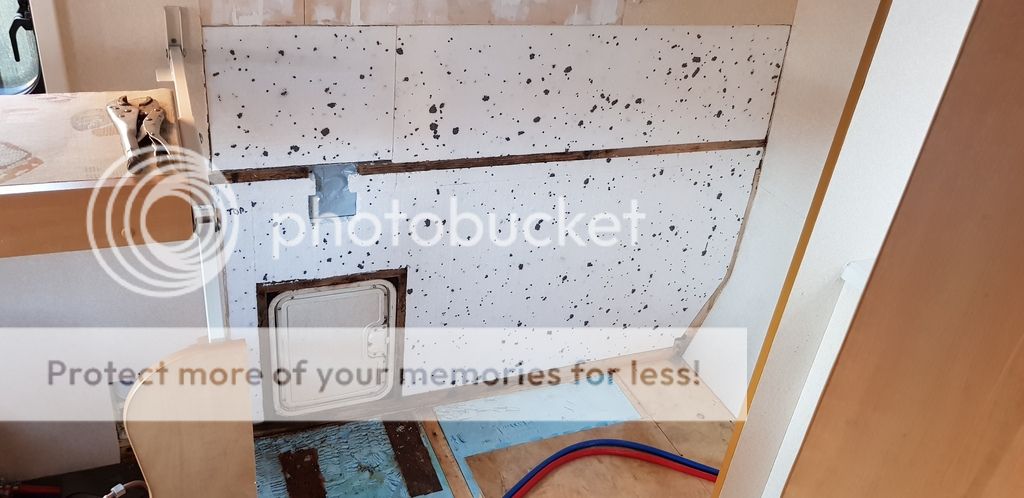
The wooden strip that is easily seen in the 3rd picture needs replaced. It's about 1.2m long and covers a join in the outside layer.

I stripped it all back until I found no trace of damp or anything moist. I am confident I have found the source.

Just need to fit it all back properly with the right stuff
 

Damian

Moderator
Mar 14, 2005
7,510
936
30,935
Visit site
The best stuff to fix the insulation to the outer skin, and the inner wallboard is Sticks Like Sh*t (yes that's what its called!!!).
Once fixed it is impossible to remove !!!!
The inner floor ply is just ordinary internal ply, the underside ply is waterproof or marine.
 
Sep 26, 2018
620
180
10,935
Visit site
I'm looking at the pictures, and coming from a marine background, I'm amazed about materials used here. It's astounding the foam insulation is polystyrene which is an open cell foam - i.e. all the cells are interconnected and water will travel from cell to cell. Polystyrene foam is a terrible product when subject to fire. GRP is also very flammable, Boats that have fires often burn down to the waterline; a caravan will be gone in moments
 

Damian

Moderator
Mar 14, 2005
7,510
936
30,935
Visit site
Guzzilazz said:
I'm looking at the pictures, and coming from a marine background, I'm amazed about materials used here. It's astounding the foam insulation is polystyrene which is an open cell foam - i.e. all the cells are interconnected and water will travel from cell to cell. Polystyrene foam is a terrible product when subject to fire. GRP is also very flammable, Boats that have fires often burn down to the waterline; a caravan will be gone in moments

I don't know why you are amazed at the materials used in caravans, it is the cheapest material available, and has been ever since they started building caravans.
As for fire, forget the van it will be gone in seconds !!!
 
Nov 11, 2009
20,100
6,131
50,935
Visit site
Guzzilazz said:
I'm looking at the pictures, and coming from a marine background, I'm amazed about materials used here. It's astounding the foam insulation is polystyrene which is an open cell foam - i.e. all the cells are interconnected and water will travel from cell to cell. Polystyrene foam is a terrible product when subject to fire. GRP is also very flammable, Boats that have fires often burn down to the waterline; a caravan will be gone in moments

I agree your comments about open cell foam transmitting water but how can you tell that it’s open cell. The first picture looks as if it could be closed cell. But whatever both foam types will burn ferociously as will a caravan with aluminium sidings too. So even with the most modern vans a fire wil completely deystroy it in minutes despite fire retardant soft furnishings.
 
Dec 20, 2018
11
0
0
Visit site
So far today I've cut the bad bits of the floor out and it's looking a lot better.

Need to get add 5 mm plywood to my shopping list now.

I've got sikaflex 512 which I am going to use to stick everything together. Spoke to the local caravan repair guy and he advised it would be alright so going with that.

Got the dehumidifier in there now so hopefully the wooden frame dries out and I can then check it but at the moment it looks like it will be alright.

Photobucket playing up so will post a pic later of how it looks now.

Starting to enjoy this to an extent lol
 
Oct 17, 2010
1,212
443
19,435
Visit site
dvdtlf said:
So far today I've cut the bad bits of the floor out and it's looking a lot better.

Need to get add 5 mm plywood to my shopping list now.

I've got sikaflex 512 which I am going to use to stick everything together. Spoke to the local caravan repair guy and he advised it would be alright so going with that.

Got the dehumidifier in there now so hopefully the wooden frame dries out and I can then check it but at the moment it looks like it will be alright.

Photobucket playing up so will post a pic later of how it looks now.

Starting to enjoy this to an extent lol
I used 512 on a repair I did a few years back, worked fine.
 
Oct 17, 2010
1,212
443
19,435
Visit site
You will need to remove any discoloured timber. I replaced like for like but before I fitted the new I treated it with external PVA glue thinned about 50/50 with water so it socked in, let it dry, completely waterproof after. Make sure dry, else 512 will not stick.
 
Nov 16, 2015
10,394
2,788
40,935
Visit site
dvdtlf said:
So far today I've cut the bad bits of the floor out and it's looking a lot better.

Need to get add 5 mm plywood to my shopping list now.

I've got sikaflex 512 which I am going to use to stick everything together. Spoke to the local caravan repair guy and he advised it would be alright so going with that.

Got the dehumidifier in there now so hopefully the wooden frame dries out and I can then check it but at the moment it looks like it will be alright.

Photobucket playing up so will post a pic later of how it looks now.

Starting to enjoy this to an extent lol

Try www. Postimg. Cc as Photo bucket stops working after a certain time and will not allow posting to websites.
 
Dec 20, 2018
11
0
0
Visit site
Will ensure all is dry and get some heat in the van while doing the bonding to keep dampness away.

I couldn't login to photobucket earlier for some reason but all sorted now.

Cheers for all the tips so far :)
 
Dec 20, 2018
11
0
0
Visit site
Craigyoung said:
My pals got a pegasus 1o'sh year old , loves it and he's been having a lot of problems at the back end and is in the process of getting it fixed but nearly £3,ooo worth ! Looks a bit like your pictures , try this link if photobucket is playing up....

https://www.practicalcaravan.com/forum/our-website/56475-posting-pictures#453457
Craig .

3k is more than I paid for mine lol. Must really like the van. I am hoping to have mine done for about 100 quid.
 
Mar 14, 2005
17,557
3,051
50,935
Visit site
dvdtlf said:
...3k is more than I paid for mine lol. Must really like the van. I am hoping to have mine done for about 100 quid.

I wish you luck but I suspect you're being overly optimistic about the cost. as A suggested previously it is very important to remove ALL affected material, and I'm concerned you may not have gone far enough back to good material.
 
Oct 12, 2013
3,037
4
0
Visit site
£1oo !! Good luck with that one , yes he loves his van yes , cant afford another , last year was at about 30% damp and he left it , used it all for the winter and when he had it checked a few months ago was up to 100% damp at the rear like yours , finger through the floor the old floor , so that has to come out and be replaced , all the toilet and shower suite out & refitted , new vinal replaced etc
 
Dec 20, 2018
11
0
0
Visit site
My pricing so far -
£30 for the 512 mastic
£54 for all the plywood and insulation from wickes
£20 for wallpaper, should have paste in the shed!

That should be the materials sorted then it's just my time.

If the wood dries out and is still solid, I won't be replacing it as I don't see the need. If it's soft or if I have any doubt about it all, I'll cut it out and replace it.

I've used a damp meter until the reading was in the dry range and stopped. I'd say I've went far enough along the side of the van to address the damp.

Will double check it all though as I don't want to be doing it again anytime soon!
 
Sep 26, 2018
620
180
10,935
Visit site
One of the GRP reinforcings used in boat building is "end grain balsa" which is effectively inch square blocks of balsa wood with the end grain pointing out, cut to the appropriate length for the thickness of moulding required. This is then laid on the inside of the "outer" GRP layer (say a deck). the inside is then glassed over, the resultant "construction" is stiff and light - where native GRP is flexible.

The ONLY problem is that any water ingress into the gap (usually because of incorrect methods of attaching fittings to the deck) results in "softening" and possibly craze cracking developing.
It's a bit of a pain to fix, but with modern materials, it's easy to do a "proper" job... Which is all a long introduction to saying you cut back until you have nothing but dry native material and the repair will then be successful.

I've done loads of bits on the boat in this way (mainly due to awful original fitout methods) and it's (a) very satisfying and (b) many times stronger than the original
 
Sep 16, 2018
274
165
10,735
Visit site
If stripping back damp wood make sure you treat whatever you are leaving, any wood which has bee soaked will be susceptible to dry rot if untreated (from bitter experience).
Also, you should have no problem with polystyrene sheet, make sure you get the fire retardant version. It's actually closed cell, which is why it's used widely as buoyancy for pontoons, dinghy's etc.
 
Dec 20, 2018
11
0
0
Visit site
Bit of an update seeing the wood has dried out.

Took the long inch square bit out the van and dried it in the house (first pic is putting it back on). Checked all the rest with the damp meter and all looks good.

Going to leave it a bit longer before putting the wood on just to make sure but happy with how it looks so far.

Wood also painted with stuff from wicked to hopefully avoid rot


TRENDING THREADS

Latest posts