Working downunder

Sep 2, 2023
67
48
85
Visit site
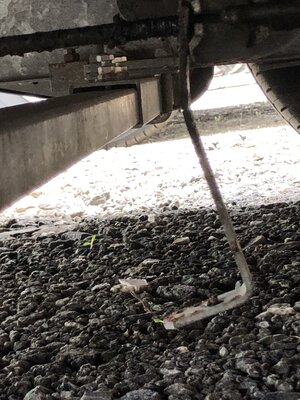
So, yesterday with time on my hands I had a cursory check under the van to ensure all is well when I spotted an 'L' shaped bracket hanging precariously close to the ground, swinging in the breeze. It turns out its a bracket that supports the brake rod and fastenes / screws to the floor of the van on the underside.
As there isn't enough ground clearance to climb under and reattach it I need to raise the van to give me some more ground clearance so I can scramble under on my back. Having never had to climb underneath before I'm thinking that I'll chock the wheels, raise the rear corner steadies and wind up the jockey wheel to tilt it backwards. As I dont want to start using jacks does this sound a reasonable solution?IMG_5035.jpeg
 

Mel

Moderator
Mar 17, 2007
5,381
1,328
25,935
Visit site
Once you have it tilted backwards you may want to lower the rear corner steadies for belt and braces stability?
You obviously know not to use the steadies as jacks.
Mel
 
  • Like
Reactions: Banus
Nov 11, 2009
20,403
6,266
50,935
Visit site
Once you have it tilted backwards you may want to lower the rear corner steadies for belt and braces stability?
You obviously know not to use the steadies as jacks.
Mel
Best to have the steadies set in a support position before tilting it backwards, as otherwise it can be difficult to access them for winding.
 
  • Like
Reactions: Banus
Jun 16, 2020
4,705
1,868
6,935
Visit site
When you wind up the jocky wheel, the rear valance may (on some vans), get damaged on the road. Just need to keep an eye on that.

You will likely need to get as high as possible with the jocky wheel, then take the load on the front steadies so that you can have another bite with the jocky wheel for maximum height. For belts and braces, also use the front steadies, blocks will be needed.

John
 
Jan 19, 2002
1,497
419
19,435
Visit site
If you have levelling ramps you could run the van up those , chock the wheels then tilt the van a bit as you have described then lower the 4 steadies to hold the van in place. You may need blocks for the steadies and the Jockey wheel. As said already do not use the steadies as jacks, but to steady the van once in position. Hopefully this will give good and safe access to do the job!
 
Aug 12, 2023
316
121
235
Visit site
Could use some wheel ramps to get more clearance and make sure it is hooked up to car so it doesn't move. Best to chock car wheels as its you life on the line.
If you plan to just tilt van, then make sure wheels are chocked both front and back. Raise it on jockey wheel with block of wood underneath then place a couple car stands under frame. Don't trust your life to jockey wheel only. This is how I fit my motor movers to front of wheels.

Stays are only for stabilising van not lifting or levelling. Level with jockey wheel and wheel ramps.
 
Sep 2, 2023
67
48
85
Visit site
Thanks all for some great advice and yes I would never use the steadies for levelling or jacking up. Looking at the ground clearance that I already have, I dont require a great deal more, so it'll be more of a slight tilt and just enough to slide under, do the job and get out ASAP! I intend to have a go on Saturday so hopefully I'll update soon after. If not...................... come looking for me:)
 
Nov 16, 2015
10,560
2,884
40,935
Visit site
Had the same problem on my Coachman within the first year, the screws holdin the bracket on were nowhere strong enough to hold the bouncing rod.
So 10 years later, manufacturers have still not sorted this problem
 
Jun 16, 2020
4,705
1,868
6,935
Visit site
Thanks all for some great advice and yes I would never use the steadies for levelling or jacking up. Looking at the ground clearance that I already have, I dont require a great deal more, so it'll be more of a slight tilt and just enough to slide under, do the job and get out ASAP! I intend to have a go on Saturday so hopefully I'll update soon after. If not...................... come looking for me:)
You will have enough room. But it does need a struggle. I could certainly not do it now, but I did replace my drainage with a rigid pipe by tilting the van about 7 years ago.

John
 
Jul 15, 2008
3,643
668
20,935
Visit site
......manufacturers fasten this bracket to the floor of the caravan with small screws into the floor structure.
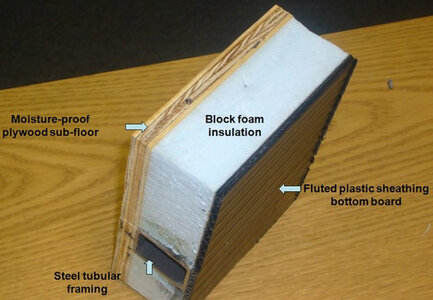
The floor is a thin sheet of plywood backed by a soft insulation material.
I positioned the bracket so as not to reused the old fixing holes and used longer bigger diameter screws.....so far it is holding!
 
  • Like
Reactions: Dustydog and Banus
Sep 2, 2023
67
48
85
Visit site
Had the same problem on my Coachman within the first year, the screws holdin the bracket on were nowhere strong enough to hold the bouncing rod.
So 10 years later, manufacturers have still not sorted this problem
Thanks for that Hutch. I bet there are loads of vans with brackets flapping around. Looks like mine has already made contact with the ground as it appears to be slightly bent so needs sorting ASAP.
Manufacturers.....ummmmm!! Had the same problem with a Bailey Autograpgh MH not long ago. Bailey thought they'd use 1/4" homebase screws to secure a metal bracket to the floor, needless to say it wasn't attached for long. The guy who sorted it for me used a strong adhesive instead of screws, wish I could remember what it was.
Just wondering how thick the floor is as if I do use screws I dont want to have screw heads poking through the floor inside the van!!
 
Sep 2, 2023
67
48
85
Visit site
......manufacturers fasten this bracket to the floor of the caravan with small screws into the floor structure.
The floor is a thin sheet of plywood backed by a soft insulation material.
I positioned the bracket so as not to reused the old fixing holes and used longer bigger diameter screws.....so far it is holding!
Thanks GB. That's what I intent to do........use new holes. Can you remember what length screws you used. I want to poke through?
 
Nov 11, 2009
20,403
6,266
50,935
Visit site
Thanks for that Hutch. I bet there are loads of vans with brackets flapping around. Looks like mine has already made contact with the ground as it appears to be slightly bent so needs sorting ASAP.
Manufacturers.....ummmmm!! Had the same problem with a Bailey Autograpgh MH not long ago. Bailey thought they'd use 1/4" homebase screws to secure a metal bracket to the floor, needless to say it wasn't attached for long. The guy who sorted it for me used a strong adhesive instead of screws, wish I could remember what it was.
Just wondering how thick the floor is as if I do use screws I dont want to have screw heads poking through the floor inside the van!!
CT1 is a very good construction adhesive and can be used underwater. I have used it outside the house to install a heavy Welsh slate name plaque. Raedil available from outlets such as Amazon. Toolstation etc.

 
Jun 16, 2020
4,705
1,868
6,935
Visit site
The bottom layer of ply is very thin.

IMG_1457.jpeg
I glued a 6inch square of 10 mm ply in position, then fixed the bracket to that. It lowerd the bracket a bit but there is lots of tolerance.

Contact or Grippfill would be fine.

John
 
  • Like
Reactions: Hutch
Sep 2, 2023
67
48
85
Visit site
Thanks guys. Loads of options available there and it appears that I'm not alone in having this minor issue. I'll update in due course. Cheers
 
Jan 20, 2023
806
678
1,135
Visit site
When I had to do this on a previous caravan I cleaned both the mating surfaces and also used a polyurethane adhesive (Tiger-Seal) in addition to the screws. It was fine afterwards.
 
  • Like
Reactions: Banus
Sep 2, 2023
67
48
85
Visit site
So, considering I only needed to fit 3 screws, I took enough tools to build a caravan from scratch as you always need the one tool you've left at home 10 miles away.
After locating the 3 original holes that were not far behind the tow hitch I only needed to raise the van a relatively small amount to be able to scramble underneath. So using the Motormover I raised the nearside 4" onto a levelling ramp, and then raised the front on the jockey wheel which gave plenty of room to scramble underneath. So, after roughing up / cleaning the surfaces I spread a large blob of epoxy resin adhesive (which sets like steel in 20 mins), on the bracket and floor then refitted the bracket slightly in front of the orginial position so as to use new holes. The screws tightened up so tight that I couldn't turn them anymore so I doubt they'll be coming out anytime soon. Time will tell as we're away on Wednesday. Job done, no dramas..........this time at least. Thank you all for your advice and comments.
 
Last edited:

TRENDING THREADS