Thetford toilet

Jun 9, 2015
4
1
18,515
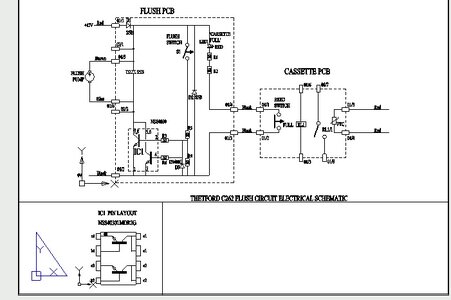
Hi all. My Bailey Pegasus Ancona has a Thetford C250 toilet which has stopped working.
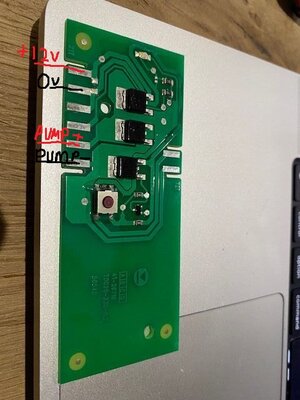
I have replaced the top switch PCB , and the smaller internal control board in the cassette compartment. Put in a new fuse and cleaned the contacts .
The pump actually works as I wired a 9v battery to test it. Nothing I do seems to work.
Any ideas because it’s really doing my head in now.
 
Sep 4, 2011
529
307
19,135
Is there actually any 12 volt getting to the toilet. Have you checked the fuse often marked pump. Is anything else on on 12 volt working. If not have you checked the main batter 20amp fuse.
 
Jun 9, 2015
4
1
18,515
Hi, thanks for getting back to me.
Do you mean 12v to the control board or to the actual pump ? The main 12V is working. Lights, ignition etc. . The main water pumps work fine, taps etc. is the “pump” fuse on the main breaker board ?
I was toying with buying a whole new pump & wiring loom but I can find a better use for £50
 
  • Like
Reactions: Hutch
Apr 23, 2024
399
324
935
Cables tend to rot in the toilet , so given you have changed the main components ,what's left is the cables.The attached schematic is for a C260 series, the difference is minor in that the reed pcb is more simple in that it only contains the reed switch , and not the polyfuse and relay.
 

Attachments

  • Thetford 262 toilet schematic-001.jpg
    Thetford 262 toilet schematic-001.jpg
    62.2 KB · Views: 7
  • Like
Reactions: West Riding lad
Jun 9, 2015
4
1
18,515
Cables tend to rot in the toilet , so given you have changed the main components ,what's left is the cables.The attached schematic is for a C260 series, the difference is minor in that the reed pcb is more simple in that it only contains the reed switch , and not the polyfuse and relay.
Thanks IanB
Not very good with wiring diagrams!
I’ve had the pump out and checked connections and wired a 9v to the cable ends and it works.
All fuses good.
Only thing I can think of is a broken control wire, but how to find which one ?
 
Mar 26, 2016
40
25
18,535
Thanks IanB
Not very good with wiring diagrams!
I’ve had the pump out and checked connections and wired a 9v to the cable ends and it works.
All fuses good.
Only thing I can think of is a broken control wire, but how to find which one ?
Use a multi meter to check continuity of each wire
 
  • Like
Reactions: Dustydog
Sep 4, 2011
529
307
19,135
Cassette door open. Front right hand side floor, you should see a plastic plate which you can prise up. Then you should find a connector which connects the caravan wiring loom to the toilet. Pull connector apart and check for voltage on the loom side. If you have 12 volts this will show your fault is on the toilet only and not the caravan wiring,
 
  • Like
Reactions: Hutch
Jun 9, 2015
4
1
18,515
Definitely 12v to the connector in the cassette compartment.
On one small motorhome I simply ripped out the wiring and replaced it . You can buy new wiring harness of thetford dealers and Ebay , one such link is :https://www.ebay.co.uk/itm/303467928291
definitely 12v to the connector in the cassette compartment.
Difficult to tell on the PCB connector.
I think it might come down to the full wiring loom & pump. I have just invested so much time & effort (and cash) chasing this round I hoped there would be an easy fix I had overlooked. !
 
Jun 6, 2006
934
197
18,935
Definitely 12v to the connector in the cassette compartment.

definitely 12v to the connector in the cassette compartment.
Difficult to tell on the PCB connector.
I think it might come down to the full wiring loom & pump. I have just invested so much time & effort (and cash) chasing this round I hoped there would be an easy fix I had overlooked. !
I’d shouldn’t be difficult at the PCB, test the red and first black cables, you should get your 12v + on them, if you don’t try the red and the next black, if you have 12v + some plum has reversed the polarity at the connector in the cassette locker.

Pressing the flush button with tester on the blue and brown wire should come back with 12v + volts
 
Apr 23, 2024
399
324
935
Difficult to tell on the PCB connector
Not really to test the wires to the pcb , (see attached photo, the) 12V supply and return come to the pcb on the first two pins( 1& 2) and the pump supply and return go out on pins 5 & 6. With everything connected up , with your DMM put the probes on 1 & 2 ,(there is enough of the contact pad to touch the DMM probes to even with the edge connector connected) you should see 12V ,
then press press the flush button , if the voltage disappears then its the supply cables, simply replace with new , they run down the back of the flush tank into the cassette locker where there will be a fuse and some connections back to the main fuse board pcb somewhere near the front of the caravan. Disconnect the battery and cut off the pcb edge connector , leaving about 25 mm of wire , then feed the new wires down the back of the flush tank to where the fuse is and connect up the existing supply wires ( which also can be cut back ) when making the new joints cover with heat shrink tubing (3mm) to seal the joints against moisture. You also just buy a new wiring harness if not confident to solder the wires together.
 

Attachments

  • Thetford toilet C250 flush pcb-marked up-001.jpg
    Thetford toilet C250 flush pcb-marked up-001.jpg
    82.4 KB · Views: 3

TRENDING THREADS

Latest posts