When do alko front and rear tow hitch friction pads need replacing

Apr 8, 2019
14
6
4,515
Visit site
Hi
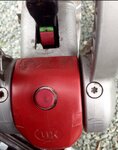
Just replaced the side friction pads on the alko stabiliser tow hitch and reading this article https://www.practicalcaravan.com/advice/how-to-change-clean-al-ko-aks-3004-stabiliser-pads post for the front and rear pads suggests:
'Look at the front of the stabiliser handle. If you see the green plastic segment below the red one (not the button on the front of the hitch), the front and rear pads are fine.

'However, if you see only the red segment, they are worn and new ones are needed.'

The problem I have, I can't see anything green other than the button and there isn't a photo to illustrate what they are refering to.
How do I know if the front and rear pads are warn and need replacing?
 
Jan 19, 2002
1,472
409
19,435
Visit site
If you Google Alko Stabiliser Coupling Guide scroll down to Adventure leisure Vehicles website then you will find a video which should answer your question
 
  • Like
Reactions: fkeates
Oct 8, 2006
1,765
538
19,935
Visit site
There are two indicators. There is the one already mentioned - the red topped button that sticks up through the rubber buffer housing you have found. The other marks are lines on the edges of the part of the unit that rotates as you push the big lever down to engage the grip on the ball.

Now you know where there are two sets of marks, re-read the user instructions and it will make sense.

Point of interest: there are no 'pads' per se that reduce the pitching, just one plastic tongue. That tongue is held in place by one self tapping screw that is in the front of the head and appears when you remove the red buffer. That screw goes into a small spigot that is on the outside of the top friction pad and is prone to shearing off. The top pad will usually stay in place but you may notice more pitching and in particular may have difficulty getting the hitch off the ball unless it is exactly straight in line with the centre line of the car. I was having that issue with unhitching and it was only when we got home from a trip earlier this year that I managed to unhitch and saw a piece of plastic lying on the ground underneath the car. I got another unit (not cheap - nearer 40 notes than 30!) but after fitting it everything suddenly got a whole lot better and unhitching was very easy. The most difficult and finger breaking bit is to get the red buffer back on. Tip: a tiny little bit of silicone lubricant or grease smeared around inside the aperture in the back of the buffer does make it slip on more easily but it is still a knuckle breaker and will improve your (obscene) language skills enormously! ;)
 
  • Like
Reactions: fkeates
Nov 16, 2015
10,394
2,788
40,935
Visit site
There are two indicators. There is the one already mentioned - the red topped button that sticks up through the rubber buffer housing you have found. The other marks are lines on the edges of the part of the unit that rotates as you push the big lever down to engage the grip on the ball.

Now you know where there are two sets of marks, re-read the user instructions and it will make sense.

Point of interest: there are no 'pads' per se that reduce the pitching, just one plastic tongue. That tongue is held in place by one self tapping screw that is in the front of the head and appears when you remove the red buffer. That screw goes into a small spigot that is on the outside of the top friction pad and is prone to shearing off. The top pad will usually stay in place but you may notice more pitching and in particular may have difficulty getting the hitch off the ball unless it is exactly straight in line with the centre line of the car. I was having that issue with unhitching and it was only when we got home from a trip earlier this year that I managed to unhitch and saw a piece of plastic lying on the ground underneath the car. I got another unit (not cheap - nearer 40 notes than 30!) but after fitting it everything suddenly got a whole lot better and unhitching was very easy. The most difficult and finger breaking bit is to get the red buffer back on. Tip: a tiny little bit of silicone lubricant or grease smeared around inside the aperture in the back of the buffer does make it slip on more easily but it is still a knuckle breaker and will improve your (obscene) language skills enormously! ;)
There are two pads, a front one and a rear one. You have to remove the front one to be able to access the rear one.
There was a thread recently that said the rear pad broke and damaged the hitch head.
 

JTQ

May 7, 2005
3,280
1,110
20,935
Visit site
There are two pads, a front one and a rear one. You have to remove the front one to be able to access the rear one.
There was a thread recently that said the rear pad broke and damaged the hitch head.

Not in my experience; the two can be separately changed, though the kit contains both items so one tends to use both of these when taking on the job. However, each "can" be changed as an individual task.

Re the OP's question about the indicator involved for the fore/aft pads, HERE in Fig 17 it is shown.

If the rear pad shatters then there is I suspect a very high risk of its retention screw probably grounding on the towball, in a quite damaging way.
 
Last edited:
  • Like
Reactions: fkeates and Hutch
Nov 6, 2005
7,341
2,046
25,935
Visit site
I would think those that have to ask that question probably do.
Not so - any DIY'er starts out with no knowledge - it's by asking questions they get enough knowledge to carry out their selected tasks.

If you support the view that anyone asking questions should use a professional then there is imply no point in PRACTICAL Caravan magazine or forum.
 
Apr 8, 2019
14
6
4,515
Visit site
Thanks for all the replies. It looks like the red 'wear indicator' is missing and it's quite common to lose it (not my photo). So I've ordered a replacement and will see what that shows once fitted.
Regarding the service engineer. He pointed out the side friction pads needed replacing and but then went on to say the whole hitch needed replacing because it was probably 'gunged up' inside (I couldn't close the hitch with new pads on his unattached tow ball, so he didn't replace them). He made no mention of the wear indicator.
I've since taken the hitch off, cleaned it (no gunge, damage or dirt) and have replaced the side pads (checked for no shims too). In doing that I thought I'd check the other pads whilst at it, but couldn't find the wear indicator - hence my post. New wear indicator ordered.
Will attach 'van to car with new friction pads and see if I can close it whilst on the car - which will give more leverage than with an unattached tow ball - and also see where the wear indicator is.
It's (apparently) very rare for the hitch to require replacing because of gunge and why I double check advice given to me by professionals, they are human and can make mistakes.
If I can't push the handle down with new pads, it would be the same with a new hitch and probably down to my strength rather than anything wrong with the hitch.
 

Attachments

  • Screenshot_20221230-215338_Chrome.jpg
    Screenshot_20221230-215338_Chrome.jpg
    203.9 KB · Views: 9
Apr 8, 2019
14
6
4,515
Visit site
The most difficult and finger breaking bit is to get the red buffer back on. Tip: a tiny little bit of silicone lubricant or grease smeared around inside the aperture in the back of the buffer does make it slip on more easily but it is still a knuckle breaker and will improve your (obscene) language skills enormously! ;)
I'd read this so was prepared! Mine went back on reasonably well, but i'd soaked it in warm water to make it pliable first, which I think helped - hitch was off the 'van too so I had more movability. I wanted to avoid using any kind of lubricant as I knew I'd risk getting it on the pads (I'm quite clumsy 😖)
 

TRENDING THREADS

Latest posts