-
We’re currently investigating an issue related to the forum theme and styling that is impacting page layout and visual formatting. The problem has been identified, and we are actively working on a resolution. There is no impact to user data or functionality, this is strictly a front-end display issue. We’ll post an update once the fix has been deployed. Thanks for your patience while we get this sorted.
You are using an out of date browser. It may not display this or other websites correctly.
You should upgrade or use an alternative browser.
You should upgrade or use an alternative browser.
Gutted - Is this an Insurance claim?
Page 4 - Passionate about caravans & motorhome? Join our community to share that passion with a global audience!
Hi Kev good luck with the repair, keep us updated how you get onWell folks the investigation works started today and guess what I didnt like what I found!!
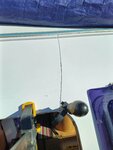
Stripped the shelf and cut part of the panel out on the inside and can only access a small part of the crack.
View attachment 1065
That hole you see is all the access I have, the wood below is 6 inches (150mm) in width and forms the head of the window frame, the wood
above is on the join where the roof meet the front panel.
(The cuts you see will actually be hidden behind another panel I removed and the shelf)
BUT THATS NOT ALL FOLKS..........
So on cleaning the surround of the window I found a further 3 cracks!
One in each bottom corner and one slightly off center at the top!
View attachment 1066View attachment 1067View attachment 1068
So I have two options, firstly remove the window and rubbers, I then may be able to lift the plastic enough to squeeze in enough bonding agent under the split and bond it to the wood frame that is there. this is obviously a very precarious option as when I lift the split panel it may crack in another place.
So in deep thought in a previous post John mentioned about plastic welding, this is now option two and the favoured option.
I can of course still bond the small area inside
I will let you know how it goes.
I thought you might try a 100 watt soldering iron and some bits of plastic from an old Airfix kit.
Ok I will get my coat. 😉
Too many beers again Hutch!!!

So the chosen repair man (more on him later) rang me on Friday to say that as it is forecast a lovely sunny day on Sunday (Today) could he come over to start the repair. No problems for me.
So the first task was to remove the window, easier said than done, all research and his experiance says lift window, remove stopper and slide off, this is the first Fleetwood he has tackled, so further search I found more info, top of window has a aluminium strip with a lip and sikaflex in position, cut sikaflexand lift the strip which was quite hard but came out.

The strip at the top being lifted out. Window then lifted out.

Window and seal now removed.

Main crack to repair.

All cleaned up and if you Look closely you can see it has now been
cut into a "V" to allow a better weld.
The bottom edge was not flush with the timber frame so the guy put
3mm plastic packing where you see the 4 clamps and on the main crack where you see the two clamps he managed to slide a 4mm packing pice under the crack.

One of the smaller cracks , drilled hole at bottom and "V" out raedy for weld.

Close up of the weld which will bind the crack together, he is back tomorrow to sand down, insert more weld where required and polish to a finish.
TO BE CONTINUED>>>>>>>>>>
So the first task was to remove the window, easier said than done, all research and his experiance says lift window, remove stopper and slide off, this is the first Fleetwood he has tackled, so further search I found more info, top of window has a aluminium strip with a lip and sikaflex in position, cut sikaflexand lift the strip which was quite hard but came out.
The strip at the top being lifted out. Window then lifted out.
Window and seal now removed.
Main crack to repair.
All cleaned up and if you Look closely you can see it has now been
cut into a "V" to allow a better weld.
The bottom edge was not flush with the timber frame so the guy put
3mm plastic packing where you see the 4 clamps and on the main crack where you see the two clamps he managed to slide a 4mm packing pice under the crack.
One of the smaller cracks , drilled hole at bottom and "V" out raedy for weld.
Close up of the weld which will bind the crack together, he is back tomorrow to sand down, insert more weld where required and polish to a finish.
TO BE CONTINUED>>>>>>>>>>
Attachments
So the chosen repair man (more on him later) rang me on Friday to say that as it is forecast a lovely sunny day on Sunday (Today) could he come over to start the repair. No problems for me.
So the first task was to remove the window, easier said than done, all research and his experiance says lift window, remove stopper and slide off, this is the first Fleetwood he has tackled, so further search I found more info, top of window has a aluminium strip with a lip and sikaflex in position, cut sikaflexand lift the strip which was quite hard but came out.
View attachment 1221
The strip at the top being lifted out. Window then lifted out.
View attachment 1222
Window and seal now removed.
View attachment 1223
Main crack to repair.
View attachment 1224
All cleaned up and if you Look closely you can see it has now been
cut into a "V" to allow a better weld.View attachment 1225
The bottom edge was not flush with the timber frame so the guy put
3mm plastic packing where you see the 4 clamps and on the main crack where you see the two clamps he managed to slide a 4mm packing pice under the crack.
View attachment 1226
One of the smaller cracks , drilled hole at bottom and "V" out raedy for weld.
View attachment 1228
Close up of the weld which will bind the crack together, he is back tomorrow to sand down, insert more weld where required and polish to a finish.
TO BE CONTINUED>>>>>>>>>>
That’s some very professional work Kev. The guy clearly knows what he is doing👏👏👏
Mighty impressed with him so far Dusty, problem was we had a lot in common and spent a lot of time yapping but I was helping to clean off all the old mastic etc.That’s some very professional work Kev. The guy clearly knows what he is doing👏👏👏
Here's a tip(he showed me), when cleaning off old mastic, cover in talcum powder first and roll it onto it self and it doesnt stick .
Then clean rest of residue off with brake cleaner. 👍
Hi kev it looking more promisingMighty impressed with him so far Dusty, problem was we had a lot in common and spent a lot of time yapping but I was helping to clean off all the old mastic etc.
Here's a tip(he showed me), when cleaning off old mastic, cover in talcum powder first and roll it onto it self and it doesnt stick .
Then clean rest of residue off with brake cleaner. 👍
Hi Raywood, definitely stress there are too many cracks/splits in different location's for impact.There is another mark there but it could be dirt. An impact would normally be cracks radiating out from the point of impact rather than vertical. I do think this is stress.
Unless some one shot my caravan with a machine gun !!!
He found a 5th one under the seal so sorting that as well.
Hi Kev at least it been sorted keep us updatedHi Raywood, definitely stress there are too many cracks/splits in different location's for impact.
Unless some one shot my caravan with a machine gun !!!
He found a 5th one under the seal so sorting that as well.
More pictures to follow of the finished repair Lady Mel, hopefully tomorrow, he was back again this afternoon (I wasnt here to keep him yapping this time) and he is back again tomorrow, not a quick fix, good job he's only 20 mins away from me.Thanks for posting the pictures. This is fascinating even for non tech people like me.😀
Hi Kev look forward to seeing more pictures of the finish Article.More pictures to follow of the finished repair Lady Mel, hopefully tomorrow, he was back again this afternoon (I wasnt here to keep him yapping this time) and he is back again tomorrow, not a quick fix, good job he's only 20 mins away from me.
Quick Update,
So Matt the Plastic's man returned today as the sun was shining for him again, he was not happy on two counts firstly there was an air bubble in his filler so rubbed down and re-filled and secondly the rubber seal on the window wasnt sitting right, so took window and seal out again and refitted!!
Back next Saturday to re-rub down and polish
His words when he left in the dark,,,,,nearly there.
Hi Wayne, agree with every thing you have said, brilliant guy, I just want to see it finished, cant wait but he is busy until next weekend.Hi Kev,
Matt sounds like a great, guy: was impressed / interested by your prior photos, great to see a craftsmans work. Sounds like he takes a lot of pride and will do you proud!
Look forward to seeubg the splendid finnished job,
Wayne
Hi Kev Cannot wait to see the pictures of this finish articleHi Wayne, agree with every thing you have said, brilliant guy, I just want to see it finished, cant wait but he is busy until next weekend.


Hi Kev Pleased to see the job has now been completed and you can now enjoy another number of adventures knowing it is now okay. Looks like a decent job and one you can be confident with.So guys and girls take a look at the before and after, tell me your thoughts and I will tell you mine when I have had some responses!!
View attachment 1283
So thats before, and now
View attachment 1284
At least it is watertight now, comments please.
Great, we just need a 'chance' to get out in 'em now!
l for one cannot wait to get out in them nowGreat, we just need a 'chance' to get out in 'em now!
Hi Kev, being totally critical , but not seeing the other repairs, I would have hoped not to see any visable repair. I can visably see an indentation, which if I was claiming on insurance I would not accept. If you run your finger over it can you feel anything , maybe the photo is deceptive..
TRENDING THREADS
-
-
-
Berker 12 volt Cigar Socket and Satellite Point Anthracite W4 Caravan 21229A
- Started by Malky
- Replies: 15
-
 Mandatory eye tests for drivers over 70 being proposed by HMG. Good or bad?
- Started by Dustydog
- Replies: 230
-

-
-
